Classes exist in both QuickBooks Online and QuickBooks Desktop; however, JobNimbus can only sync classes with QuickBooks Desktop.
Class is a label that you create in QuickBooks. It is a useful, versatile function that allows you to classify records in your QuickBooks for reporting purposes. Classes are customizable to filter reports by whatever label you need, such as Departments, Properties, Construction, Concrete, Commercial, Residential etc.
To Enable Classes in QuickBooks Desktop
- Select "Edit" on the main top bar
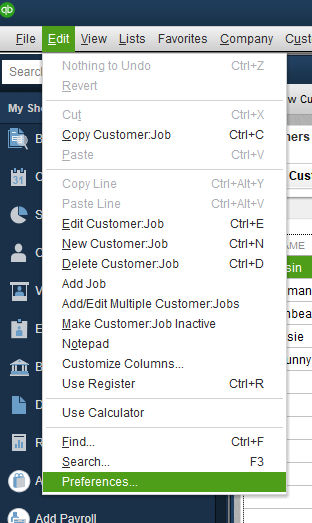
- Select "Preferences"
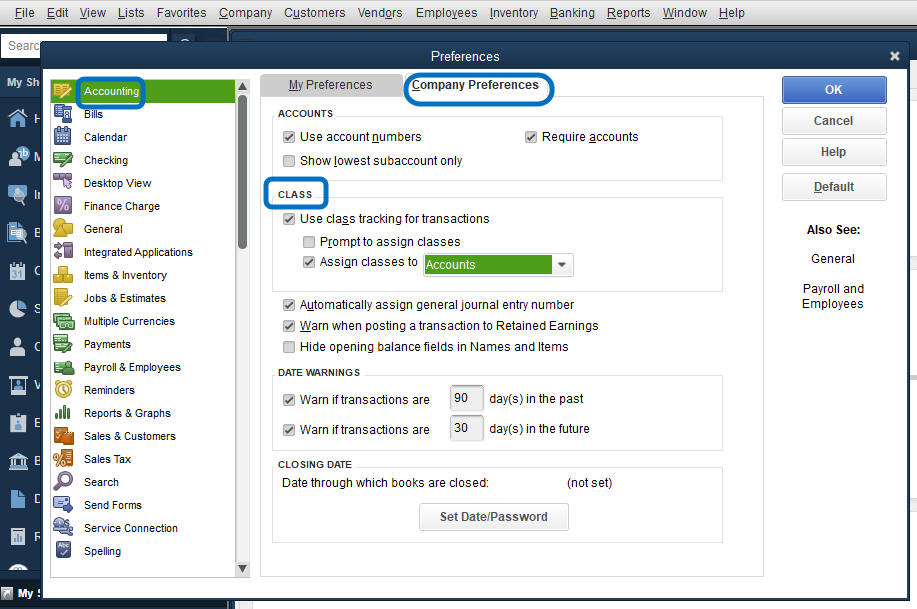
- Select "Accounting"
- Select "Company Preferences"
- Check off "Use class tracking for transactions"
- Select "Ok"
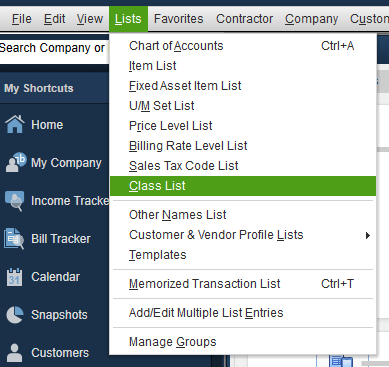
To Add Classes to QuickBooks
-
Go to QuickBooks → Lists → Class List
-
Click on the Class dropdown menu at the bottom, then select New.

-
Add the class and hit OK
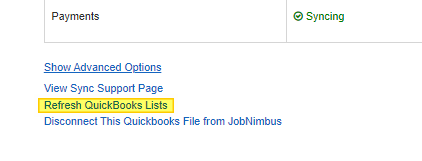
To Import Newly Added Classes From QuickBooks
-
Go to JobNimbus → Settings → QuickBooks tab
- At the bottom of the screen, select 'Show Advanced Options'
- Click ‘Refresh QuickBooks Lists’
- Open the Web Connector and hit “Update Selected” How do I manually Force Sync using the QuickBooks Web Connector?
Please note: it may require multiple Web Connector runs after the list update for the classes to show within JobNimbus.
To Enable Class Syncing in QuickBooks
- Go to JobNimbus → Settings → QuickBooks tab
-
Select "Show setup options"
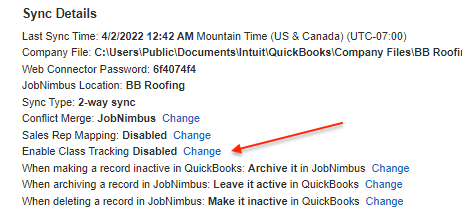
- Select "Change" next to Enable Class Tracking
-
Check the box next to “Enable Class Tracking”
- Select "Continue”

To Disable Class Syncing in JobNimbus:
Once you disable classes in JobNimbus, the ‘class’ field will no longer appear within JobNimbus.
- Go to JobNimbus → Settings → QuickBooks tab
-
Select "Show Setup Options"
- Select "Change" next to Enable Class Tracking
-
Uncheck the box next to “Enable Class Tracking”
-
Select "Continue"
With Class Tracking Enabled:
Once class syncing is enabled, a new field will appear in JobNimbus. You can add classes via the edit screen to the Invoice in JobNimbus. The drop down will include the classes added to your class list in QuickBooks.

FAQ:
- How do I know if class syncing is enabled?
- Go to your QuickBooks settings in JobNimbus. Under "sync management", select show more options. Here you can see if class tracking is enabled.
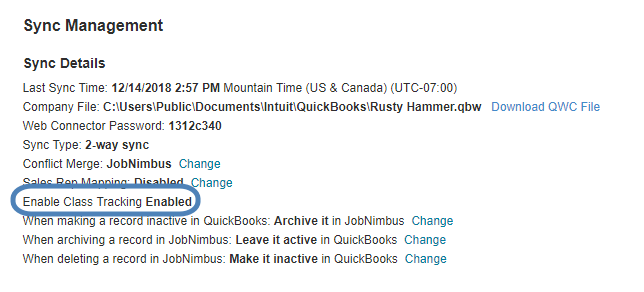
- Go to your QuickBooks settings in JobNimbus. Under "sync management", select show more options. Here you can see if class tracking is enabled.
- I created a new class in QuickBooks and it is not showing in JobNimbus?
- See steps above for the "To Import Newly Added Classes From QuickBooks" section.
- I deleted or made a class inactive in QuickBooks and I don't immediately see these changes.
- It may take several hours/sync runs for changes to take place.