On This Page
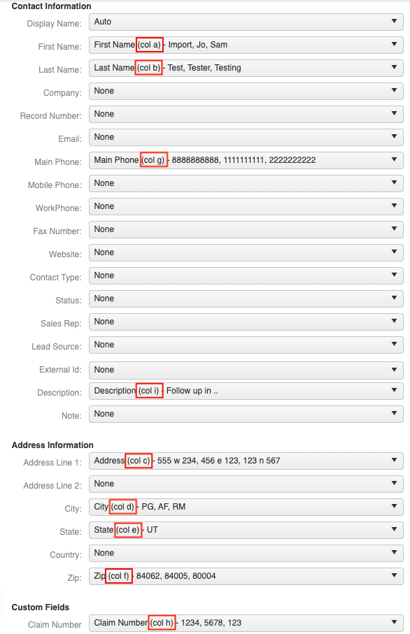
Mapping Fields
- Review the Contact fields you want to have filled out upon import by editing or creating a Contact.
- Within your CSV file, create a column for each of these fields, ensuring each one is spelled like the field name in JobNimbus.
- Tip: you can import data to Custom Fields.
- As you review the drop-down menus with the corresponding data, make note of the column ID that is pulling the information over and confirm it matches the column ID of your file.
- Note: the default label "Auto" for the Display Name dropdown menu means that the system will automatically fill the Display Name field of the Contact with their first + last name, which is what happens when you manually add Contacts, as well.
Importing Your Contacts
Please be aware that importing works for Contacts only. Jobs cannot be imported.
-
In order to Import your Contacts, you must first create a CSV file with your Contacts listed.
-
Once you have created your CSV file, go to a Jobs board (it does not matter which one), then select the Contacts button in the top right corner of the board.
-
Select the Import contacts button.

-
Click Select file to browse your computer for the CSV file containing your Contacts.
Note: The file you choose to import must be in a CSV format in order to be compatible. Other file types will not work.
-
JobNimbus will scan your file, looking for the number of records, and try to identify the type of data in each column.
-
After the scan is complete, a series of dropdown lists will appear. Use these menus to map each piece of data you are importing with the corresponding JobNimbus field. You can find information about how to properly map your fields here.
-
Once all the fields are mapped to the data you have, click the Next button.
-
Review the data and confirm by selecting Import Contacts Now.

-
This import can take anywhere from a few minutes to hours to complete, depending on the number of Contacts being imported.
-
You can continue to work in your account in the meantime and JobNimbus will send you an email once the import is finished.
Note: As you add Contacts to your account, the associated IDs are tracked in sequential order. When you import a CSV file of records, the same rules apply to their IDs as if they were manually created. If you delete a Contact that has been imported, the next Contact you add to the account, whether manually or via import, will inherit the next ID number in the sequence.
Resolving Import Errors
Error Message: "Duplicate contact exists. You can fix this by passing in a unique Display Name"
-
This message will occur if you have imported two Contacts with identical Display Names. Although Contacts can have the same first and last name, the display names must be unique in order for the import to be successful.
Steps to resolve:
- Search your CSV file by using the Ctrl+F (or Command+F on Mac) option to search for the Contact name in question.
- Update the display name column within the CSV file to eliminate the duplicates.
- Save the updated file, then begin the import process again using the newly updated CSV version.
Eliminating Duplicates
-
Occasionally, duplicate Contacts can be created during an import if they do not have the same Display Name.
- Example: If you have already entered John Doe in your JobNimbus account and you import a duplicate Contact under John S. Doe.
-
If you have accidentally created duplicates, you can merge your the duplicates by following the steps in this article.
Note: Merging cannot be done in bulk. If you would like to entirely delete many records at a time, you can bulk delete by creating a Custom Report.