On This Page
- Enable the integration in JobNimbus
- Enable the integration in ArcSite
- Creating Webhook Automation
- Push Proposal to JobNimbus
Enable ArcSite in JobNimbus
- Click on your Initials or Profile Picture and select Settings.
- Click on API in the menu to the left. Then, select New API Key.
- Choose ArcSite from the dropdown under Description.

- Choose which Access Profile to use.
- We recommend using the Office Manager access profile for the created API key. If the owner's profile is used, our API will only be able to access data from that account and not from other employees in the company.
- Once you Save an API key will be generated, and you can copy that directly.

Enable the integration in ArcSite
- Navigate to the Integrations page on the ArcSite User Site.
- Click Apps from the menu on the left side of the page.
- Select Connect to JobNimbus
- Enter the API Key that was generated by JobNimbus (see step 4 above) and select Connect.

- Once you've selected Connect, ArcSite will verify the API key. If the key is valid, the page will auto-refresh, and the JobNimbus app will show as "Connected". A webhook URL for JobNimbus to use will be generated automatically by ArcSite.

- Tap on the settings button to choose one account as the default project owner/creator to ensure that the email accounts match.

Setting up Webhook Automations
- Navigate back to the JobNimbus Settings page and select Automation. Then select Add Automation.
- In the Add Automation window:
- Select Event based as the Trigger type.
- Then, select when either when a Contact is created or when a Job is created.
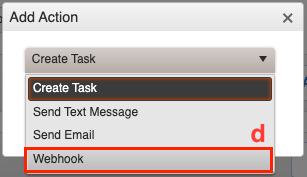
- Click Add Action.
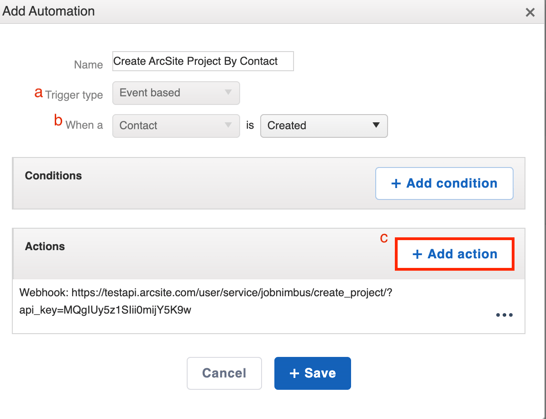
- Select Webhook from the dropdown. Then, paste your webhook URL and click Save.

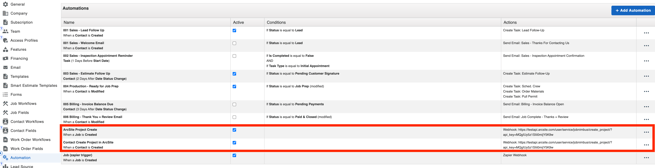
- After you have created the automation for both a Contact and a Job, you will see two ArcSite webhook call rules in your automation list.
Push a Proposal Document to JobNimbus
- Within your JobNimbus account, navigate to your JobNimbus Home Page, click Add Job.
- If you have not created automations for both Contacts and Jobs as detailed above, make sure you create the record that corresponds to the rule you have created (i.e. If you only have an automation created for when a Job is added, the automation will only trigger if you Add a Job, not a Contact).
- If you have not created automations for both Contacts and Jobs as detailed above, make sure you create the record that corresponds to the rule you have created (i.e. If you only have an automation created for when a Job is added, the automation will only trigger if you Add a Job, not a Contact).
- Fill in your Contact or Job's information, and select Save.
- Navigate to the Projects page on ArcSite and verify that the project has been created.
- In the ArcSite app, create a drawing and upload it to the cloud.
- Open the Project.
- Open the uploaded drawing.
- Open the Takeoff & Estimate tab.
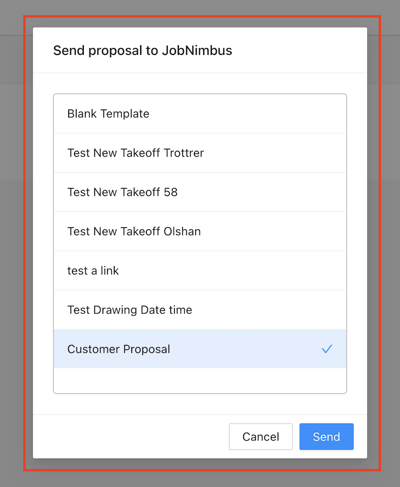
- Click Send to JobNimbus.

- Select one proposal template to push to JobNimbus.
- After pushing the document successfully, go to the Job to view the document under the Documents tab.