Through the Web App
- Navigate to a Contact or Job's page
- Click on the Payments and Invoices tab, then select the blue + create button in the top right corner and select Payment.
This will pull up the "Add Payment" window.

Here, you can add a payment date, payment method, a reference number (this field is required but can be any number you want as it is for your own reference), and payment amount. Then, select the Invoice that you want to associate it with from the list by checking the box next to the desired Invoice record.
Once you have entered the payment information, select the Save Payment button.
Through the Mobile App
Apple (iOS)
Within the JobNimbus Mobile App, navigate to a Contact or Job for which you want to record a payment. Choose one of the methods outlined below to record your payment.
- Option 1
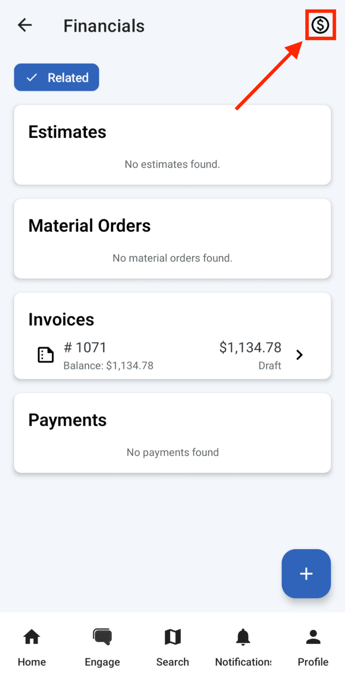
On the Financials overview page, click the dollar sign icon in the top right corner.
- Once here:

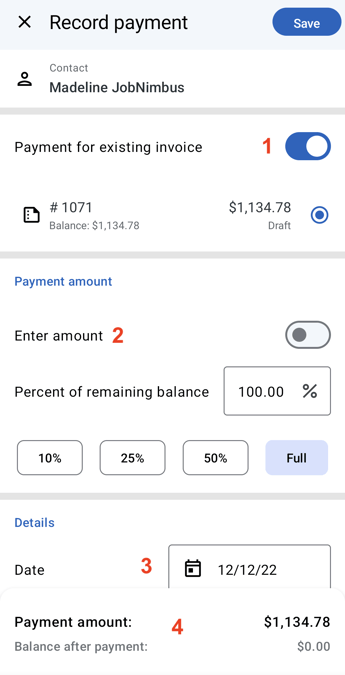
- Toggle the switch next to "Payment for Existing Invoice" to associate the payment with a specific invoice's open balance.
- Adjust the payment amount. You can toggle the switch next to "Enter amount" to type in a custom dollar amount or choose a percentage of the total amount due.
- Change the date of the payment. By default, "today's" date will reflect.
- Configure the method by which the payment was made.
- Add a custom reference number. This is required, but it can be anything you want, as it is for your own reference.
- If an invoice is being associated and the payment covers the full amount due, the remaining balance will reflect as $0.00. Otherwise, the new amount due will show on this line. If no invoice is associated, this line will only show "Payment amount".
- Option 2
On the overview page of a specific invoice, click the Collect payment button.
- Once here:

- The associated invoice's ID number will appear at the top, along with its current Status, due date, and remaining balance.
- Adjust the payment amount. You can toggle the switch next to "Enter amount" to type in a custom dollar amount or choose a percentage of the total amount due.
- Change the date of the payment. By default, "today's" date will reflect.
- Configure the method by which the payment was made.
- Add a custom reference number. This is required, but it can be anything you want, as it is for your own reference.
- If the payment will cover the full amount, the remaining balance will reflect as $0.00. Otherwise, the new amount due will show on this line.
Android
Within the JobNimbus Mobile App, navigate to a Contact or Job for which you want to record a payment:
- On the Financials overview page, click the dollar sign icon in the top right corner.
- Once here:
- Toggle the switch next to "Payment for Existing Invoice" to associate the payment with a specific invoice's open balance.
- Adjust the payment amount. You can toggle the switch next to "Enter amount" to type in a custom dollar amount or choose a percentage of the total amount due.
- Change the date of the payment. By default, "today's" date will reflect.
- If an invoice is being associated and the payment covers the full amount due, the remaining balance will reflect as $0.00. Otherwise, the new amount due will show on this line. If no invoice is associated, this line will only show "Payment amount".
Already have a Payment added? Learn how to associate it with a new Invoice here.
Tip: With JobNimbus Payments, you can digitally request and process invoice payments from your mobile device.
Check out the following articles for more information: