On This Page
Automating Text Messages
You can use JobNimbus' Automations to automatically trigger text messages as you move through your workflow, allowing for better communication between you and your customers.
To automate text messages, first navigate to Engage and select the phone numbers option under the Engage Settings menu on the the left-hand side. Here you can set the days and hours of operation during which you would like automated texts to be sent.

Best Practices and Federal Regulations
Text messages can be triggered as they meet the conditions of each automation (as listed in the recipes below). However, per federal regulations, Automations will only send texts between 8am and 9pm of the company's local time zone.
Sending a large number of messages in a short period of time may cause a temporary block by telecommunication carriers. To avoid disruptions in service, do not send more than 10 texts per second.
Disclaimer:
Customers must explicitly opt-in to texting before receiving automated text messages.
For informational related messages, such as job updates and appointment reminders, this consent is assumed if the customer texts you first and/or provides their mobile number with verbal consent. For promotional or marketing related text messages, you must receive consent in writing before sending.
It is your responsibility to gather consent for texting. These regulations are required by federal law.
Creating Text Automations
- To create text automations, first click on your profile icon or initials in the top right corner. Then, select Settings.
-
Select the Automations option from the Settings menu on the left side of your screen. This will take you to the Automations screen.
- Follow the Automation recipes below to create automated texts.
Creating a "Welcome" Text
- Click on the +Add Automation button.
- Choose the "Event based" trigger type.
- Select the "Contact" trigger record.
- Choose when the record type is "Created".

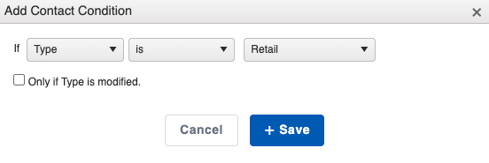
- Select +Add Condition.
- If Type is [desired Workflow].
- Leave the box next to "Only if Type is modified" unchecked.
- Save the Condition.
- Select +Add Action.
- Choose the "Send text message" Action.
- Select the primary number you want to send from.
- If using multiple numbers for your business, an Automation will need to be built for every line.
Create the Automation once, click the three dots on the right to duplicate it, and simply change the “Send from:” field in each copy.
- If using multiple numbers for your business, an Automation will need to be built for every line.
- Choose your recipients (Contact or All Related Contacts).
- Select the primary number you want to send from.
- Example text to copy/paste into the Enter Message field (feel free to add/remove/edit any of the given Template Fields to customize your message to your liking):
- Hello {{ContactFirstName}}, This is {{ContactSalesRepName}} from GenComp. We are excited to work with you on your home improvement needs. I’ll keep you up to date with texts on progress and details. Please feel free to text or call me at any time. If you prefer not to use text messaging, text STOP at any time.
Creating an "Estimate Sent" Text
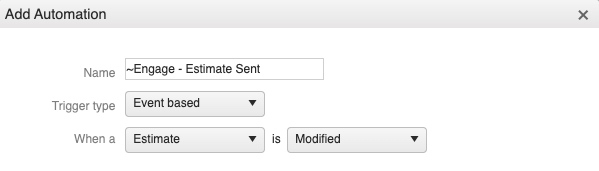
- Click on the +Add Automation button.
- Choose the "Event based" trigger type.
- Select the "Estimate" trigger record.
- Choose when the record type is "Modified".
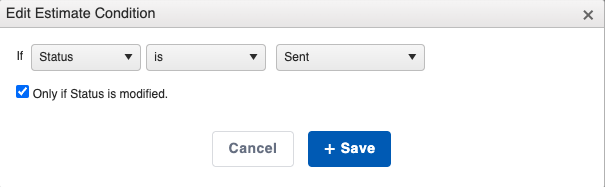
- Select +Add Condition.
- If Status is "Sent".
- Save the Condition.
- Select +Add Action.
- Choose the "Send text message" Action.
- Select the primary number you want to send from.
- If using multiple numbers for your business, an Automation will need to be built for every line.
Create the Automation once, click the three dots on the right to duplicate it, and simply change the “Send from:” field in each copy.
- If using multiple numbers for your business, an Automation will need to be built for every line.
- Choose your recipients (Contact or All Related Contacts).
- Select the primary number you want to send from.
- Example text to copy/paste into the Enter Message field (feel free to add/remove/edit any of the given Template Fields to customize your message to your liking):
- Your estimate from GenComp is ready for {{ContactAddressLine1}}. We just emailed you the estimate, so please check your inbox to review and approve. Please text or call if you have any questions.

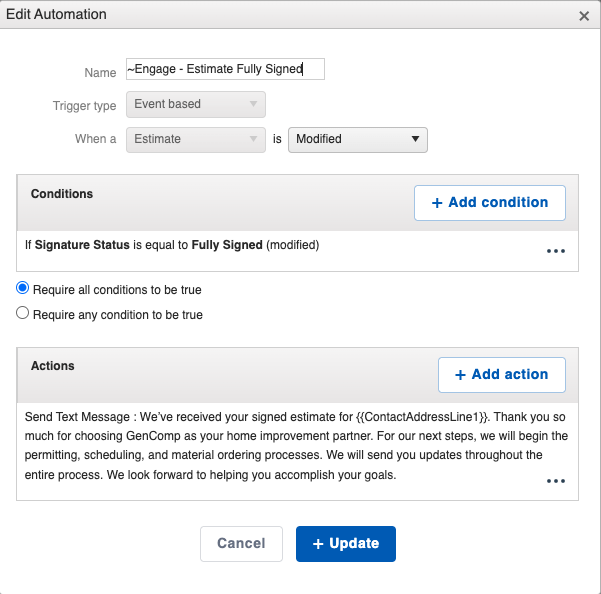
Creating an "Estimate Signed" Text
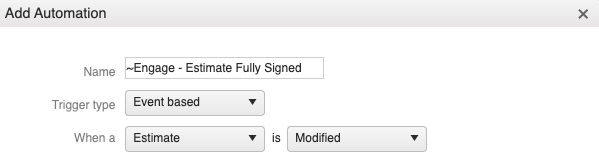
- Click on the +Add Automation button.
- Choose the "Event based" trigger type.
- Select the "Estimate" trigger record.
- Choose when the record type is "Modified".
- Select +Add Condition.
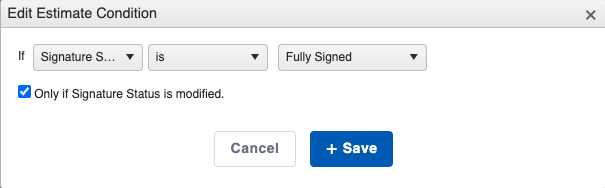
- If Signature Status is "Fully Signed".
- Check the box next to "Only if Status is modified".
- Save the Condition.
- Select +Add Action.
- Choose the "Send text message" Action.
- Select the primary number you want to send from.
- If using multiple numbers for your business, an Automation will need to be built for every line.
Create the Automation once, click the three dots on the right to duplicate it, and simply change the “Send from:” field in each copy.
- If using multiple numbers for your business, an Automation will need to be built for every line.
- Choose your recipients (Contact or All Related Contacts).
- Select the primary number you want to send from.
- Example text to copy/paste into the Enter Message field (feel free to add/remove/edit any of the given Template Fields to customize your message to your liking):
- We’ve received your signed estimate for {{ContactAddressLine1}}. Thank you so much for choosing GenComp as your home improvement partner. For our next steps, we will begin the permitting, scheduling, and material ordering processes. We will send you updates throughout the entire process. We look forward to helping you accomplish your goals.
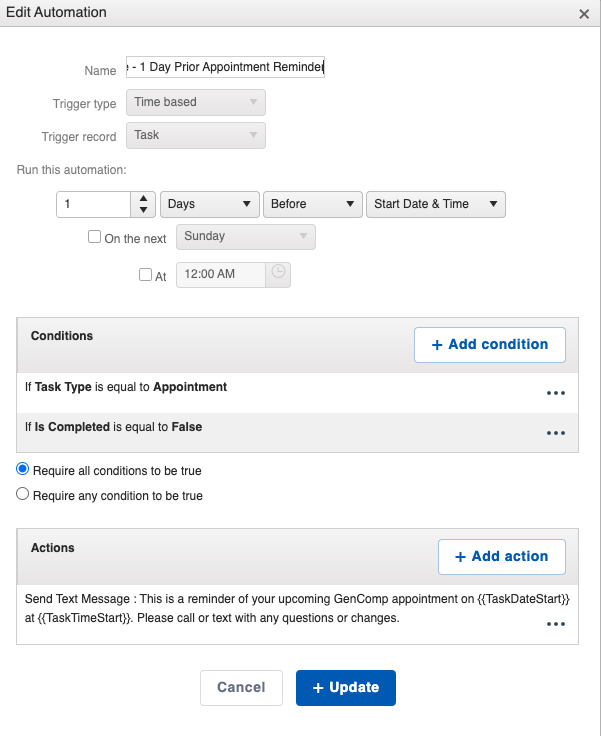
Creating an "Appointment Reminder" Text
- Click on the +Add Automation button.
- Choose the "Time based" trigger type.
- Select the "Task" trigger record.
- Run this automation:
- Choose how long before the appointment that you want to send a reminder —
“[X Days] [Before] [Start Date & Time]”
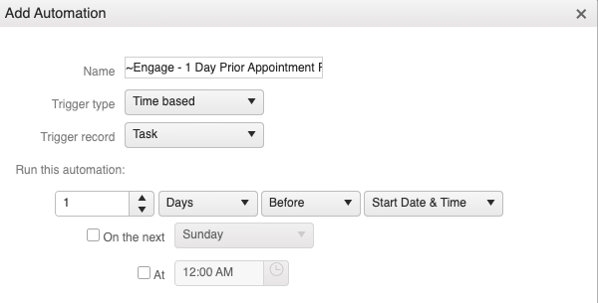
- Choose how long before the appointment that you want to send a reminder —
- Select +Add Condition.
- If Task Type is "Appointment".
- Save the Condition.
- Select +Add Condition, again.
- If Is Completed is "False".
- Save the Condition.
- Make certain that the Require all conditions to be true option is selected.

- Select +Add Action.
- Choose the "Send text message" Action.
- Select the primary number you want to send from.
- If using multiple numbers for your business, an Automation will need to be built for every line.
Create the Automation once, click the three dots on the right to duplicate it, and simply change the “Send from:” field in each copy.
- If using multiple numbers for your business, an Automation will need to be built for every line.
- Choose your recipients (Contact or All Related Contacts)
- Select the primary number you want to send from.
- Example text to copy/paste into the Enter Message field (feel free to add/remove/edit any of the given Template Fields to customize your message to your liking):
- This is a reminder of your upcoming GenComp appointment on {{TaskDateStart}} at {{TaskTimeStart}}. Please call or text with any questions or changes.
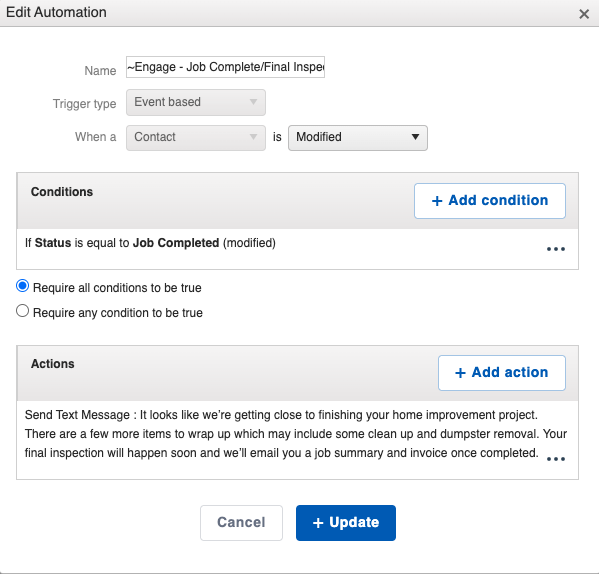
Creating a "Status Change" Text
This specific example outlines how to notify your customer that their Status has been updated to "Job Completed", and that a "final inspection" is the next step.
- Click on the +Add Automation button.
- Choose the "Event-based" trigger type.
- Select the "Contact" trigger record.
- Choose when the record type is "Modified".

- Select +Add Condition.
- If Status is "Job Completed".
- Check the box next to "Only if Status is modified".
- Save the Condition.

- Select +Add Action.
- Choose the "Send text message" Action.
- Select the primary number you want to send from.
- If using multiple numbers for your business, an Automation will need to be built for every line.
Create the Automation once, click the three dots on the right to duplicate it, and simply change the “Send from:” field in each copy.
- If using multiple numbers for your business, an Automation will need to be built for every line.
- Choose your recipients (Contact or All Related Contacts)
- Select the primary number you want to send from.
- Example text to copy/paste into the Enter Message field (feel free to add/remove/edit any of the given Template Fields to customize your message to your liking):
- It looks like we’re getting close to finishing your home improvement project. There are a few more items to wrap up which may include some clean up and dumpster removal. Your final inspection will happen soon and we'll email you a job summary and invoice once completed.
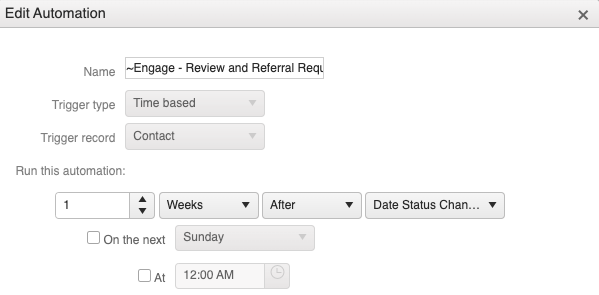
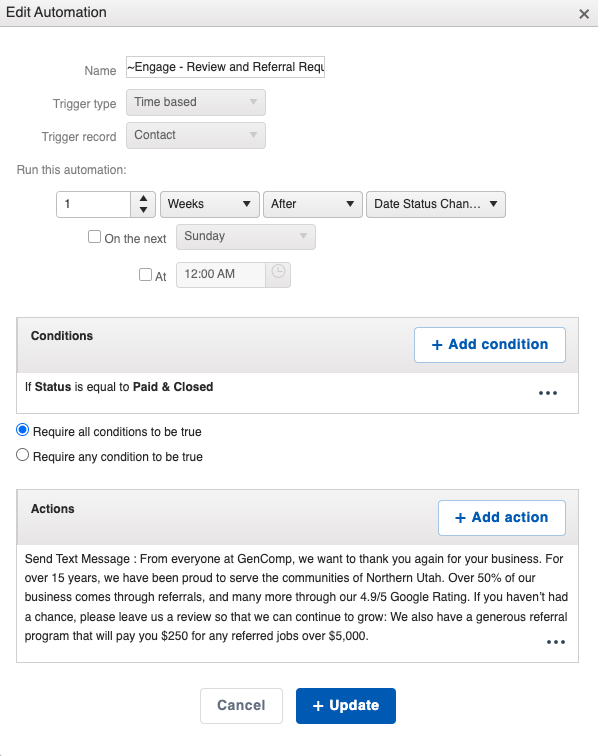
Creating a "Review/Referral Request" Text
- Click on the +Add Automation button.
- Choose the "Time based" trigger type.
- Select the "Contact" trigger record.
- Run this automation:
- "1 Week After Date Status Change".
- "1 Week After Date Status Change".
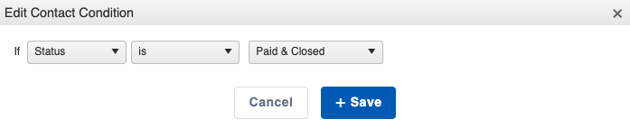
- Select +Add Condition.
- If Status is "Paid & Closed".
- Save the Condition.
- Select +Add Action.
- Choose the "Send text message" Action.
- Select the primary number you want to send from.
- If using multiple numbers for your business, an Automation will need to be built for every line.
Create the Automation once, click the three dots on the right to duplicate it, and simply change the “Send from:” field in each copy.
- If using multiple numbers for your business, an Automation will need to be built for every line.
- Choose your recipients (Contact or All Related Contacts).
- Select the primary number you want to send from.
- Example text to copy/paste into the Enter Message field (feel free to add/remove/edit any of the given Template Fields to customize your message to your liking):
- From everyone at {{LocationName}} , we want to thank you again for your business. For over 15 years, we have been proud to serve the communities of Northern Utah. Over 50% of our business comes through referrals, and many more through our 4.9/5 Google Rating. If you haven’t had a chance, please leave us a review so that we can continue to grow: <Link>
We also have a generous referral program that will pay you $250 for any referred jobs over $5,000.
- From everyone at {{LocationName}} , we want to thank you again for your business. For over 15 years, we have been proud to serve the communities of Northern Utah. Over 50% of our business comes through referrals, and many more through our 4.9/5 Google Rating. If you haven’t had a chance, please leave us a review so that we can continue to grow: <Link>
Creating an "Invoice Link" Text
- Choose the Event based trigger type.
- Select the "Invoice" trigger record.
- Choose when the record type is "Created".
- Select +Add Action.
- Choose the "Send Text Message" Action.
- Select the primary number you want to send from.
- If using multiple numbers for your business, an Automation will need to be built for every line.
Create the Automation once, click the three dots on the right to duplicate it, and simply change the “Send from:” field in each copy.
- If using multiple numbers for your business, an Automation will need to be built for every line.
- Choose your recipients (Primary Contact).
- Select the primary number you want to send from.
- Example text to copy/paste into the Enter Message field (feel free to add/remove/edit any of the given Template Fields to customize your message to your liking):
- Hello, {{JobPrimary}}!! Your invoice is ready to be paid. Click this link to view and pay your invoice: {{InvoiceLink}}
Thank you for your business! - Note: You must use the {{InvoiceLink}} template field in order to send your customers a link to their invoice.

- Hello, {{JobPrimary}}!! Your invoice is ready to be paid. Click this link to view and pay your invoice: {{InvoiceLink}}
We recommend testing a new Automation with a test Contact or Job before taking any real action that may cause the message to send to a customer.
Simply create a Contact and/or Job with your own phone number and details, then trigger the Automation to ensure it works as you expect.