On This Page
Creating Custom Contact or Work Order Fields
-
Click on your profile icon or initials in the top right corner. Then, select Settings from the dropdown menu.
- From the Settings menu under the Workflows & Fields tab, then select Contact Fields (if you want to add Work Order fields, select Work Order Fields).
- Click the blue + Add contact field button.
- Date - Allows you to select from the calendar or input a date using the m/d/yyyy format.
- Decimal - Add a number that includes decimal placement. You can also check the box next to “Display as currency?” so the amount that is plugged into the field includes a dollar sign.
- Number - Whole numbers. A comma will automatically be added to numbers larger than 999.
- Text - A string of text containing symbols, numbers, and letters.
- Boolean - Add a checkbox to indicate yes/no. A marked checkbox translates as “true”, an unmarked checkbox translates as “false”.
- Options List - Add a drop-down list with up to 70 options to choose from.
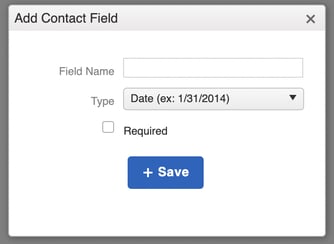
- Checking the box next to Required will not allow you to save the changes to the Contact until that field has been interacted with.
Manage your saved fields using the buttons to the right:
- Edit: Update the name or whether the field is required.
- You cannot change the type of field once it has been saved.
- Hide: If you no longer want the field to appear on a Contact's file, you can remove it from view at any time.
- Hiding a field will not delete any data that has been added if you choose to make it visible again.
- Delete: This will permanently remove the field, as well as any data that has been added to it from every single record.
- Lost data from these fields cannot be recovered once deleted.

To change the order of the fields as they appear when editing or creating a Contact, simply drag and drop the rows within your settings as shown below.

Limitations:
- Deleting a Custom Field cannot be undone.
- Existing Default Fields of a record (i.e. Phone Number, Company, Address, etc.) cannot be made Required.
- The maximum number of allotted Custom Fields for each type is 50.
Creating Custom Job Fields
- To create a custom Job Field, click on your profile picture or initials in the top right corner of your screen.
- Select Settings from the dropdown menu.
- From the Settings menu, open the Workflows & Fields tab, then select Job Fields.
- You will then be taken to the Job Fields management page. Here, you can:
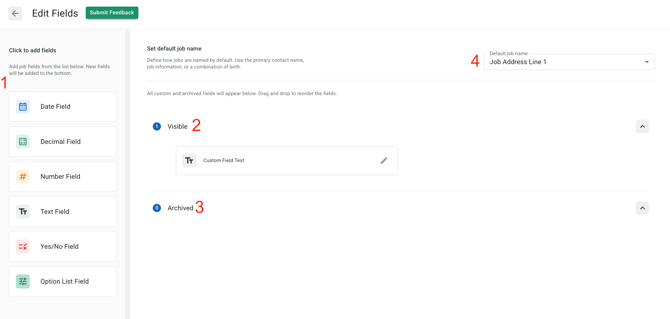
- Add Fields by selecting the type of field you want to add.
- All fields have the option to be made required.
- You can choose from:
- Date Field- Allows you to select from the calendar or input a date using the m/d/yyyy format.
- Decimal Field- Add a number that includes decimal placement. You can also check the box next to “Display as currency?” so the amount that is plugged into the field includes a dollar sign.
- Number Field- Add a field for whole numbers. A comma will automatically be added to numbers larger than 999.
- Text Field- A string of text containing symbols, numbers, and letters, which you can opt to make searchable.
- Yes/No Field- Add a checkbox to indicate yes/no. A marked checkbox translates as “true”, an unmarked checkbox translates as “false”.
- Options List Field- Add a dropdown list with up to 70 options to choose from.
- Within the options list field, you can also re-order your options by clicking and dragging your options on your list.

- Within the options list field, you can also re-order your options by clicking and dragging your options on your list.
- View and Mange your Visible Fields by clicking the pencil icon next to the field you want to edit.

- Edit your field name.
- Toggle the required field option on or off.
- Archive your field so that it is no longer usable and shows in the the Archived Fields section.
- Be aware that when archiving a field, it will no longer be visible on any Jobs, including Jobs where you have previously used it. You can restore this data by restoring the field, as explained in the warning below. This warning will show when you select the Archive button.

- Be aware that when archiving a field, it will no longer be visible on any Jobs, including Jobs where you have previously used it. You can restore this data by restoring the field, as explained in the warning below. This warning will show when you select the Archive button.
- Delete your field.
- Save your changes.
- View and Manage your Archived Fields by clicking the pencil icon next to the field you want to edit.
- The options to edit Archived Fields are the same as the options for Visible fields, shown above in item 3, with the sole exception of the Restore Field button, which allows you to make the field visible on Jobs again.

- The options to edit Archived Fields are the same as the options for Visible fields, shown above in item 3, with the sole exception of the Restore Field button, which allows you to make the field visible on Jobs again.
- Change your Default Job Name by selecting from the available options in the dropdown as shown below.

- To keep your fields in order, make sure to place your fields into categories when creating your fields.

Limitations:
- Deleting a Custom Field cannot be undone.
- Existing Default Fields of a record (i.e. Phone Number, Company, Address, etc.) cannot be made Required.
- The maximum number of allotted Custom Fields for each type is 50.