On This Page
- Job Dashboard
- Activity
- Fields
- Threads
- Tasks
- Photos
- Documents
- Estimates
- Material & Work Orders
- Payments & Invoices
- Profit Tracker
- Forms
- Custom Documents
Job Dashboard
- You can access a Job by using the search bar or by selecting a Job from one of your Boards.
-
Once you access a Job record, you will be taken to the Job Dashboard, which will show you an overview of your Job.
-
At the top of the page, you will see the Job name, along with the primary Contact's name, phone number, and email address. You will also find shortcuts to create financial documents, notes, emails, tasks, and text messages (Engage required).

-
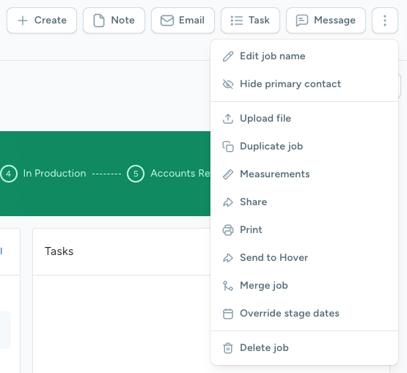
Click on the three dots on the right for options to edit the Job, hide the Primary Contact, and other administrative options listed in the screenshot below.
-
You can customize this view by selecting the Edit Layout button in the top right corner and dragging the available widgets to your desired location on the Dashboard, and add, remove, and resize available widgets by clicking on the Manage Widgets button. These settings will apply to your user profile across all your devices.
-
On the right side of you Dashboard, you will find your Jobs details. Here, you can:
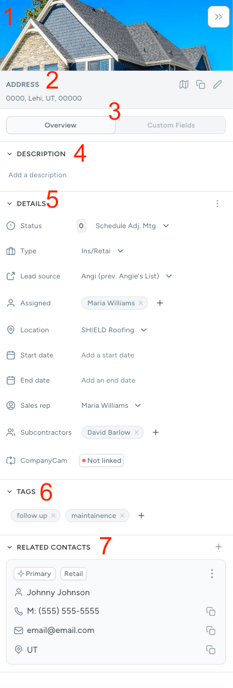
- Upload a Job Cover Photo by selecting the Select Photo button. You can also update the Job Cover Photo by hover over the photo clicking on the Change Photo button.
- Click on the Job address to get directions, click the Copy button, or edit the address by clicking on the Pencil Icon.
- View the overview of the Job Details, or click the Custom Fields button to view any custom fields that you have filled out for that Job.
- Enter a Job Description.
- View and update the Job Status and view the number of days it has been in that status, the Job type, Lead Source, the user(s) assigned to the Job, the Job location, start and end dats, Sales Rep, assigned Subcontractors, and any synced integrations such as QuickBooks or CompanyCam.
- Add and view tags.
- View any related Contacts. The Primary Contact will always be on top, with the Primary Contact tag next to it.
- You can add additional related Contacts by clicking the plus icon on the right.
- Click the three dots on the right side of a Contact card to select Go To Contact, Remove From Job, or Make Primary Contact (if the selected Contact is not currently the primary).
Activity
-
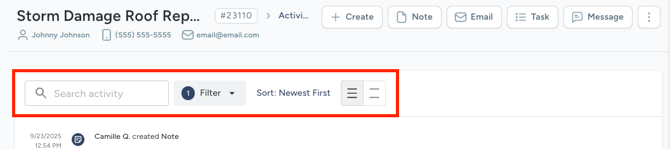
Select the Activity option on the Job menu on the left to view all activities that have happened on a Job in chronological order, starting with the newest activity first.
- You can search, filter, or reorder your Job activity by clicking on the corresponding options at the top of the Activity feed.
Threads
- Select the Threads option from the Job menu on the left to view and comment on Notes, Photos, and Work Orders.
- To make a note on a record, click on the record that you would like to notate.

- From here, you can enter a note into the text box at the bottom of the window. Select the Send button or hit Enter on your keyboard to send the threaded note.
- You can also @ mention other users in the system by typing @ and selecting their name from the resulting menu. The user will be notified of the mention via their notification center.

Fields
-
This tab shows all the Custom Fields you have for your Jobs. You can enter responses to these fields here if you didn't fill them in during the Job creation.
- You can click on the gear icon on the right side of the page to enable the "Always Edit Mode", hide fields that have not been filled out, or go to the Field Settings to edit your Custom Fields.
Tasks
-
Selecting Tasks on the left side menu will give you a list of all tasks associated with the Job record.
- To add a task, select the Task button at the top of the Job and fill out the necessary fields.
- To view task details or make changes, click on the desired Task. Here, you can:

- Edit the task by clicking the pencil icon in the top right.
- Duplicate a Task by clicking on the copy icon.
- Delete the Task by clicking the trashcan icon.
- View Task details.
- Mark the Task as Complete.
- Postpone the Task.
Photos
- Click on the Photos option on the Job menu to view any photos associated with the Job record.
- To add photos, select the Upload button in the right-hand corner.

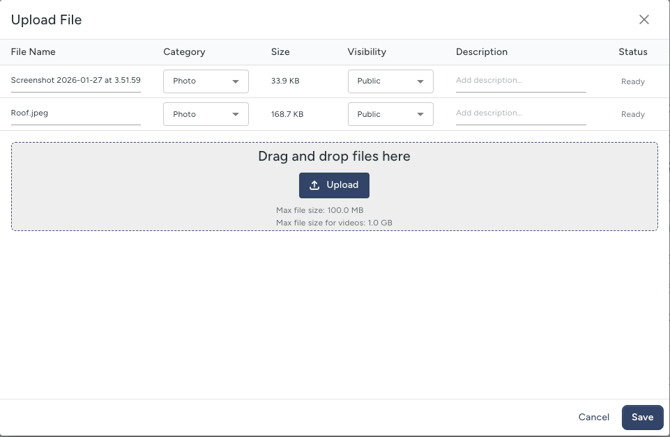
- Click and drag files from your desktop or click on the upload button to select photos. You may upload multiple photos at once by adding multiple photos in the upload option or dragging multiple files into the upload window.
- In the same window, you can rename the photo file, view the file size, edit the visibility, and add a description.
- Select Save to complete the upload.
- Note: Photo files must be .JPG or .PNG files in order to show up in the photo feed. PDF files will automatically be sent to the Documents tab. This is not a setting that can be changed. If you have a photo that is not a .JPG or .PNG file, you will need to convert the file type outside of JobNimbus.
- To view a photo's details, click on the photo in the feed.

- In the details, you can edit the photo name by clicking on the text box.
- Click on the Describe Image button to generate an AI description, or type a photo description by typing in the Description text box.
- Add a comment to the photo by typing a message into the text box at the bottom of the window. You can tag users by clicking or typing the @ symbol in the note. You can respond to comments by selecting the reply option under an existing comment.
- To download photos, select the download all button or open an individual photo and select the download icon at the top of the photo window.
Documents
-
Clicking on the Documents Tab will show you all documents associated with the Job record.
- To upload a document, select the Upload File button in the right-hand corner.
-
Click and drag files from your desktop or click on the upload button to select photos. You may upload multiple photos at once by adding multiple photos in the upload option or dragging multiple files into the upload window.
-
-
Click on the three dots on the right-hand side of each document to edit, download, or delete individual documents.

- To download all documents from a Job, select the Download All button at the top of the page.
Estimates
-
Click on the Estimates tab to view all Estimates associated with the Job. Here, you can:
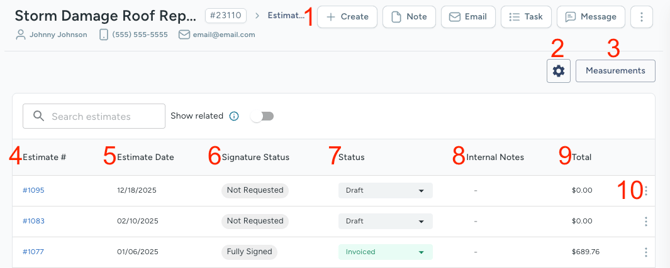
- To create a new Estimate, select the +Create button at the top of the page and select the Estimate option. For more detailed information on creating Estimates, click here.
- Update your Estimate Layout settings by clicking the gear icon.
- Order or upload Measurements Reports.
- View and click on the Estimate numbers to view the Estimate document.
- View the Estimate Date.
- View the Signature Status.
- View the Estimate Status.
- View Internal Notes.
- View the Estimate Total.
- Click on the three dots to edit, duplicate, review and share, mark as signed, convert to a material order, or delete an Estimate.
Material & Work Orders
-
You can create a new Material and Work Orders by clicking on the Create button at the top of the Job page and selecting either Material Order or Work Order.
- At the top of the page, you can click on the Measurements button to order or upload a measurements report.
Material Order
-
Under the Material Order section, you can:
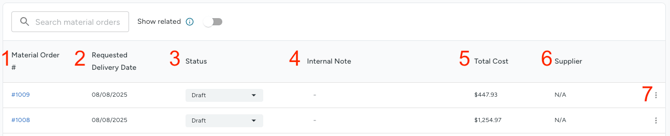
- Click on the Material Order number to view the Material Order.
- View the Requested Delivery Date.
- View or update the Status.
- View any Internal Notes on the Material Order.
- View the Total Cost.
- View the Supplier if applicable.
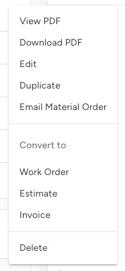
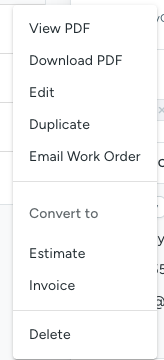
- Click on the three dots to view administrative options such as editing or duplicating a Material Order, or converting it to a Work Order, Estimate, or Invoice.
Work Order
-
Under the Work Order section, you can:
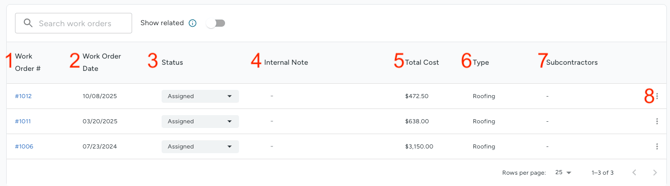
- Click on the Work Order number to view the Work Order.
- View the Work Order Date.
- View or update the Status.
- View any Internal Notes on the Work Order.
- View the Total Cost.
- View the Work Order Type (which is determined by your workflows).
- View any Assigned Subcontractors.
- Click on the three dots to view administrative options such as editing or duplicating a Work Order, or converting it to an Estimate or Invoice.
Payments & Invoices
-
In the Payments & Invoices tab, you can view Invoices, Payments, and Credit Memos.
- To create a new Invoice, Payment, or Credit Memo, select the Create button at the top of your Job page and select the document you would like to create.
Invoices
-
In the Invoice section, you can:
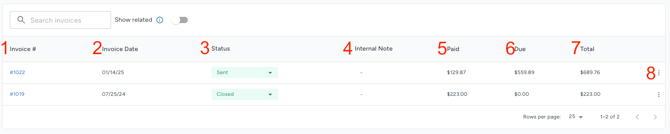
- Click on the Invoice number to view the Invoice.
- View the Invoice Date.
- View or update the Status.
- View any Internal Notes on the Invoice.
- View the Amount Paid.
- View the Amount Due.
- View the Invoice Total.
- Click on the three dots to view administrative options such as editing or duplicating an Invoice, or converting it to a Work Order, Material Order, or Credit Memo.
Payments
-
In the Payments section, you can:
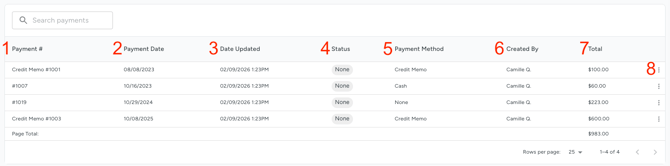
- View the Payment Number.
- View the Payment Date.
- View the Date Updated.
- View the Status.
- View the Payment Method.
- View which user created the Payment record.
- View the Payment Total.
- Click on the three dots to edit or delete a Payment.
Credit Memo
-
In the Credit Memo section, you can:
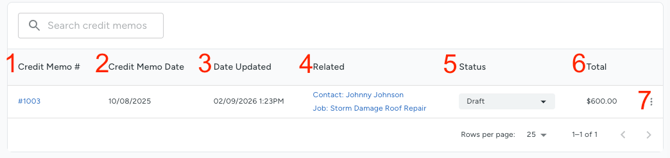
- Click on the Credit Memo number to view the Credit Memo.
- View the Credit Memo date.
- View the Date Updated.
- View the Contact and Job the Credit Memo was applied to.
- View and update the Credit Memo Status.
- View the Credit Memo Total.
- Click on the three dots to view administrative options such as editing, duplicating, or applying a Credit Memo to an Invoice.
Profit Tracker
-
Clicking on the Profit Tracker tab will take you to a new page in JobNimbus. Here you can add Estimates, Material Orders, and Work Orders to view important financial information and track commissions.
-
To learn more about Profit Tracker and how it works, click here.
Forms
-
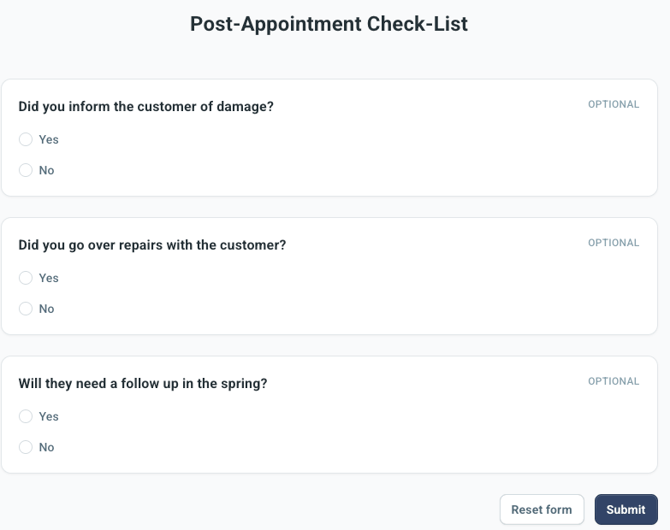
The Forms section is where you can find all responses to all the forms that have been filled out by either you or a team member.
- You can fill out a form on the Job by selecting the Create button at the top of the Job page and selecting Form from the dropdown menu.
- From there, you will select the Form you would like to fill out, then input the information on the next screen. Select Submit when you have finished.
- From there, you will select the Form you would like to fill out, then input the information on the next screen. Select Submit when you have finished.
-
To create a new form, click on Settings at the top of the Forms page and follow the steps listed here.
Custom Documents
-
In the Custom Documents tab, you will see any Documents that you have added to the Job that were created through the JobNimbus Document Templates.
-
Here, you can:
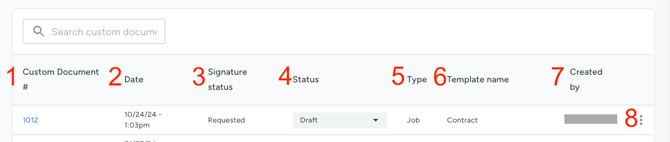
- Click on the Document number to view the Document as a PDF.
- View the Date and Time the Document was created.
- View the Signature Status.
- View the Document Status.
- View the record type associated with the Document.
- View the Template Name.
- View which user created the document on the Job.
- Click on the three dots to view administrative options to edit, view as a PDF, download, or delete the Document.