On This Page
For iOS
Uploading Files to the JobNimbus App
- Open the document in your preferred app on your mobile device.
- Tap on the share icon (a square with an upward arrow) and choose the option to Save to JobNimbus from the menu.

Tips:
- If you don't see this option, simply tap on "Edit Actions..." to customize which apps are available.
- In order to save files to JobNimbus, make sure you are logged into your account.
- Choose the Contact or Job that you want to upload the file to.
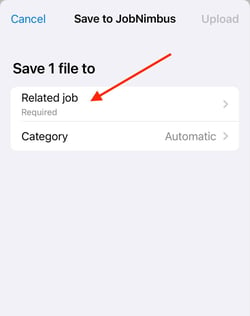
- Select a category for the file based on the Attachment Categories you have set up in your JobNimbus Settings. Once you choose a category, you will see the Upload button enabled and ready to be pressed.

Scanning Documents
- Navigate to a Contact or Job record in the JobNimbus mobile app.
- Under the Files tab, select Documents.

- Click the + button in the top right corner and choose "Scan document" from the menu. The scanner will open and prompt you to position the document into view.
.png?width=250&height=230&name=IMG_7050%20(1).png)
- Position the document within the borders, and the camera will automatically scan the page for you.
- You can also tap the shutter button to take a photo of the document manually. This option also allows you to crop the image of the document by dragging the circle icons (indicated by red arrows in the image below).
- Once you have adjusted it, you can choose to Retake or Keep the Scan.

- The automatic scan will persist until you click on the Save button located at the bottom right corner. Remember to name the file when prompted to keep your files organized.
- After completing the upload or scanning process, you will be automatically taken back to a list view showing the documents linked to the relevant record.
For Android
Uploading Files to the JobNimbus App
- Open the document in your preferred app on your mobile device.
- Locate the Share option.
- Navigation and label may vary. For this example, the file will be uploaded from Google Files.

- Select the JobNimbus Mobile App icon.

- Select the Contact or Job whose account you'd like to upload the file to.

- Choose an Attachment Category for the file (available options will depend on the Attachment Categories you have configured in your account settings).

- The file name will populate with the label you gave the document originally, but can be changed by typing in the field. A description is optional.
- Click Upload.

Scanning Documents
- Navigate to a Contact or Job.
- Under the Files tab, select Documents.

- Click the + Add new button in the bottom right corner and choose Scan document from the menu.


The scanner will open and prompt you to position the document in view.

- Once aligned with the borders, click on the shutter button at the bottom of the screen to scan the page.
- The scanner will remain open for you to take more than one scan in a single session until you proceed.
- Click next at the bottom right corner when you are ready to review and edit as needed.
- When you're ready to upload, click the Save button in the bottom right corner.

- Name the file when prompted.
- You will be automatically directed back to a list view of the documents associated with the related record.