On This Page
For Apple Devices
Navigation
There are two ways to go about importing or taking a photo from within the JobNimbus Mobile App.
To Add Photos From the Home Page:
- Click the + icon in the top right corner and select "Photo" from the menu.
Or
- Choose the Camera option from the Quick Links menu.

- Search for the Contact or Job record you wish to add the photo to.

- The camera will automatically open once you select a Contact or Job.
- From here you can take a new photo with the camera or bypass taking a new photo and upload an existing image instead by tapping Done.

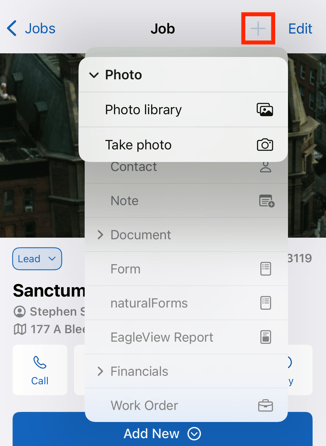
From a Contact or Job Page
- Navigate to the record you want to associate a photo with.
- Click the blue + icon in the top right corner and select "Photo" from the dropdown.

From here, you can add a photo from your library or take a new photo.
Taking a New Photo
To take a new photo in your JobNimbus app, select the Take Photo option.

When the camera opens, you will see several icons with which you can interact.
Here, you can:
- Adjust your camera settings for use within JobNimbus by selecting the gear icon.
- Toggle your GPS coordinates on or off.
- Toggle the option for Date and Time stamps on or off.
- Adjust your zoom settings.
- Adjust your flash settings.
- Flip your camera to front or back-facing camera.
- Take photos.
- Bypass the camera to view photos that have already been saved to the record.
Uploading an Existing Photo
Once you have navigated to the next screen from either of the options above, select the Photo Library option to add an existing photo from your device.

- Select the photo or photos that you would like to upload.
- A blue checkmark will appear next to the selected file(s).
- Select the blue Add button once you have selected the desired photos.

Your selected photos will show in the photo gallery on the next page once they have uploaded.

Note:
- Photo quality Settings on Web will override your Settings on Mobile. If you notice an issue with the quality of your uploaded photos, you may need to adjust your photo quality Settings on Web.
Editing a Photo
- Navigate to the Job or Contact record where your photo is located and select Photos.

- Select the photo you want to edit and tap the pen icon.

- There are a number of options to edit your photo.

- Change the color of your arrow (3), text (4), marker (5), and shape (6) tools.
- Magnify a specific area by tapping on the photo.
- Easily draw an arrow.
- Add text.
- Draw using the pen tool.
- Add shapes.
- Undo and redo changes.
- Crop and rotate your photo.
- In the crop option (8), you can:

- Crop your photo by moving the picture border.
- Flip your photo.
- Rotate your photo left.
- Rotate your photo right.
- Select Save in the top right corner when you are finished editing to save your changes.
For Android Devices
Navigation
There are two ways to go about importing or taking a photo from within the JobNimbus Mobile App.
To Add Photos From the Home Page:
- Click the Plus button on the bottom right of the home screen.

- Select the Photo option.

- Search for the record that you would like to add your photos to by tapping the Search bar and typing in the Job or Contact name.

- Once you have selected the desired record, the app will open your camera within JobNimbus.
- From here you can take a photo or add existing photos from your device.
To Add Photos from a Contact or Job:
- Navigate to the desired record.
- Select the Photos option under the files tab.

- Select the camera icon to take a photo or add existing photos from your device.

Taking a New Photo
To take a photo, select the camera icon, then select the From Camera option.

When the camera opens, you will see several icons with which you can interact.

From here, you can:
- Adjust your camera settings, including:
- Toggle GPS coordinates.
- Toggle Date and time stamps.
- Adjust photo upload quality.
- Add GPS coordinates.
- Add Date and Time Stamps.
- Adjust your zoom.
- Adjust your flash.
- Flip your camera to front or rear camera
- Take photos.
- Tap Done once you are finished taking photos.
Adding an Existing Photo
To add an existing photo from your device, tap the camera icon, then select the From Photo Roll option.

- Select the photos you would like to upload, then tap the Add button in the bottom right corner.

Note: If you are not currently within range of data or wifi, the photo will be cached in your mobile app and will upload as soon as you have wifi or data.
Editing a Photo
- Navigate to the Job or Contact record where your photo is located.

- Select the photo you want to edit and click the pencil icon at the bottom of the page.

- There are a number of options to edit your photo.

- Crop and turn your photo.
- Drag and move your photo.
- Zoom in on a specific area by tapping on the photo.
- Easily draw arrows.
- Draw using the pen icon.
- Add text.
- Add shapes and magnify parts of your photo
- Lasso around the shapes you've added from #4 to adjust placement and size.
- Change the color and thickness of the lines and shapes you can add in #4 and #5.
- Select Save in the top right corner when you are finished editing to save your changes.