How Do I Use the Solo Integration?
After creating an API Key in JobNimbus to produce a Webhook in Solo, you can send proposals from Solo and create a customer as a JobNimbus Contact.
Prior to using, you will need to enable the integration by following the steps outlined in this article.
Creating a Customer
- Within your Solo account, click on the New Customer button at the top of your page.
- Enter the customer's details in the Customer Information and Location fields.
- Include a valid address in the Location fields.
- Click Next to move forward.

- Confirm the location and then click Next.

- Enter the Utility Information details in the appropriate fields and scroll down on the page.

- Click Submit to save the customer.

- Log into your JobNimbus account and search for the customer's name to locate the new Contact that was created as a result.
Sending a Proposal
In Solo
- Within your Solo account, navigate to a Customer's profile.
- Hover over the menu on the left-hand side and choose Solar.

- Click the Generate and Send Proposal button.

In JobNimbus
- Within your JobNimbus account, navigate to the Contact's record.
- Select the Financials tab.
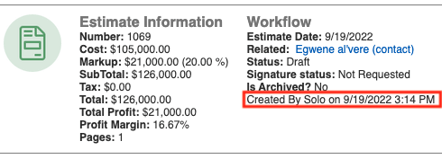
- Review the new Estimate that was created from the Solo proposal.
- In the Estimate's activity, you will see that it was created by Solo.


- In the Estimate's activity, you will see that it was created by Solo.
The line items that sync to an Estimate are solar panels, power inverters, and batteries.
Additional Information:
- This is a one-way integration from Solo to JobNimbus; no activity created in JobNimbus will sync to Solo.
- The webhook(s) must be successfully setup in Solo before customers and proposals can sync to JobNimbus.
- Please be aware that this integration will only work with JobNimbus Legacy financials, not with the New Sales Experience.