On This Page
- Ordering an EagleView Report
- Importing a Hover Report
Ordering an EagleView Report
Note: In EagleView, the report owner must apply measurements in order for suggested waste percentage to show. If someone other than the person who ordered the report applies the measurements, the waste percentage will not show.
- To order reports from EagleView, first go to the Job you wish to order a report for. Then, click on the Estimates tab and select Measurements.

- Select the Order option under EagleView and enter the required information.
- Enter the job address and select the search address button.
- Then, enter the Order Details in the provided fields, including the Property Type, EagleView Product, delivery option, measurement instructions, and insurance information (if applicable).

- Once the order is completed, it will show under the Available Reports section. Once it is available, select the Apply button to apply the report to the Measurement Tokens section.

Note:
- Premium Residential and Premium Commercial reports are the only report types supported in JobNimbus.
- In order for the measurement report to be imported into the corresponding Job's Documents tab, the measurements must be successfully applied.
- To view these reports later, simply select the Measurements option again under the Financials tab and select to View the report you wish to see.
Ordering an EagleView Report on iOS
- To order reports from EagleView on the iOS app, first go to the Job you wish to order a report for. Then, select Measurements.
- Select the Order button next to the EagleView option.
- On the next page:
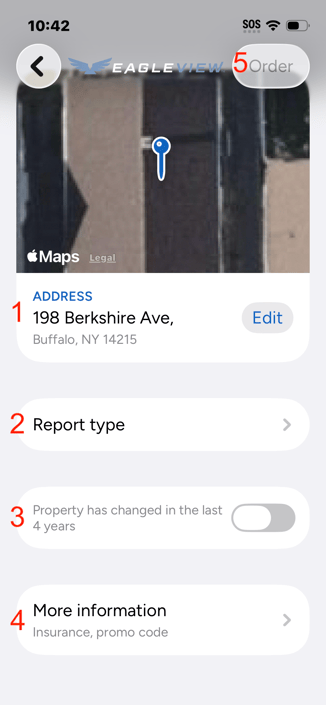
- Search for or edit the address of the property.
- Select a Report Type.
- Toggle if the property has changed within the last four years.
- Enter any additional information needed.
- Enter the Claim number, additional comments, your purchase order number, or promo code.

- Enter the Claim number, additional comments, your purchase order number, or promo code.
- Select Order to order your EagleView report.
Ordering an EagleView Report on Android
- To order reports from EagleView on the Android app, first go to the Job you wish to order a report for. Then, select Measurements.
- Select the Search/Order button next to the EagleView option.
- Select the Create new order button at the bottom of the page.
- On the next page:

- Search for the address of the property.
- Select a Report Type.
- Toggle if the property has changed within the last four years.
- Enter any additional information needed.
- Enter the Claim number, additional comments, your purchase order number, or promo code.
- Select Order to order your EagleView report.
Importing Hover Reports on Web
- To import Hover reports, first go to the Job you wish to order a report for. Then, click on the Estimates tab and select Measurements.

- On the next page, select the Search button on the Hover option.
- Enter the address of the report you want to import in the search bar and select search.
- Select the Report you want to import, then select Download Report.
- Once you import your report, it will show the status next to the report. Once it the status is Completed, select the Apply button.
Importing Hover Reports on iOS
-
To import reports from Hover on an iOS device, navigate to the Job you wish to import an order for, then select Measurements.
-
Next to the Hover option, select Search.
-
Type the address of the report you want to import, then tap Select.
-
From here, you can View or Select the Hover report.
Importing Hover Reports on Android
-
To import reports from Hover on an Android device, navigate to the Job you wish to import an order for, then select Measurements.
-
Next to the Hover option, select Search.
-
Type the address of the report you want to import, then tap Select.
-
From here, you can View or Apply the Hover report.