How Do I Troubleshoot Contact and Job Syncing in QuickBooks?
How to troubleshoot a Contact or Job not syncing:
If you are using Jobs, then each Job must be assigned a Primary Contact for it to sync. That Primary Contact must sync to QuickBooks before the Job can sync to QuickBooks
Reasons a contact is not syncing:
-
Sync is not set up or Contacts or Jobs are not yet set to sync
-
The Contact or Job is not in a status that syncs
-
The Display name of the Contact or Job is already being used in QuickBooks (duplicate)
-
The Customer or Sub-Customer is Inactive in QuickBooks
1. Sync is not set up:
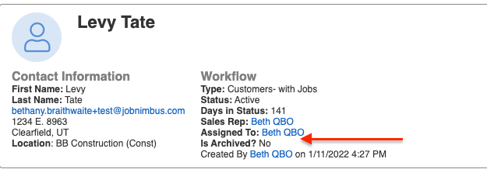
If the sync is not set up the Contact will not have the line "Synced to QuickBooks". To set up the sync make sure you have watched the videos on setting up your workflows and connecting the sync: Connect my JobNimbus account to QuickBooks Desktop ; Connect with QuickBooks Online.
Contacts:
Sync that has been set up:
 Sync that has not been set up:

Jobs:
Sync that has been set up: 
Sync that has not been set up:
2. The Contact or Job is not in a status that syncs

The Contact is in a status that is not set to sync to QuickBooks.
To check your workflow settings:
Go to "Settings"
-
Select the "Contact Workflow" (or Job Workflow) tab
- Select the three-dot menu to the far right
- Select "Edit"

To Edit a status in order to send it to QuickBooks:
-
Select the "Ellipsis" again on the status you wish to change
-
Select “Edit”
-
Check the box “Send to QuickBooks” and Save

Note: Updating this setting will send ALL contacts or jobs currently assigned to this status to QuickBooks.
To change the Contact status:
-
From the Contact, select the "Ellipsis" in the top right.
-
Hover over ‘Change Status’ and select the status you wish to change it to.

To change the Job's status:
- From the Job, select the status name under "Details."
- Search or scroll to find the status you want, then select it.

- You can also ‘drag & drop’ the card to the proper status from the job board.
3. Duplicate:
QuickBooks will not allow a duplicate name to be added to QuickBooks. If a name is used in QuickBooks that matches exactly the display name from JobNimbus, QuickBooks will not allow the record to sync. The field "display name" on a contact has to be unique for each contact.
If the display name is already being used in QuickBooks (this could be in the Vendor or even the employee section of QuickBooks).
-
To fix this: edit the display name in JobNimbus to make it unique and it will sync as a new customer in QuickBooks.
4. Inactive in QuickBooks:
If a contact or job is made ‘Inactive’ in QuickBooks, JobNimbus can no longer sync to it. You can make the contact active again in either QuickBooks Online or Quickbooks Desktop. You can also delete the contact out of JobNimbus.

Make active (undeleting) in QuickBooks Online:
-
Go to your customer list in QuickBooks
-
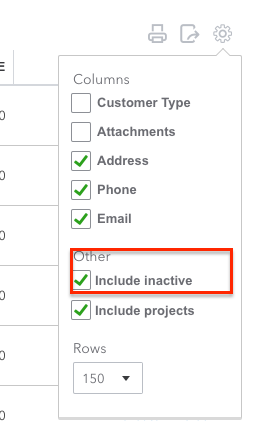
Click on the gear icon just above the customer list
-
Check the box next to ‘include inactive’

- Select "Make Active"

Make active in QuickBooks Desktop:
-
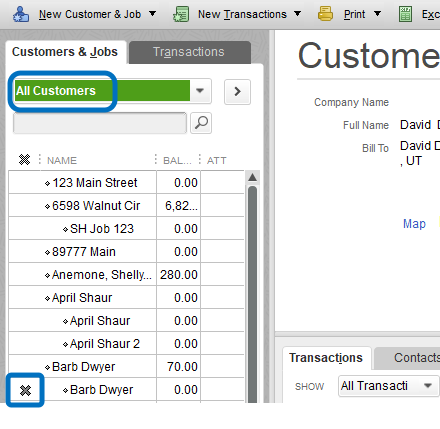
Select "All customers" in the customer center.

-
Locate the inactive customer
-
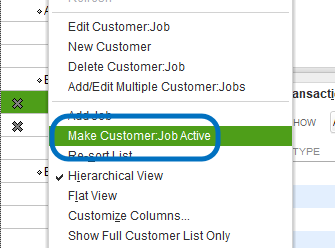
Right-click on the customer and select "Make Customer: Job active" or simply click the X to the left to remove it.

Note:
-
If you update the same Contact/Job in each system before it syncs, there will be a conflict, in that case the system that is chosen as preference will override the other. It is best to choose one location to make major updates to a Contact/Job (phone number, address, email).