How Do I Configure My Workflows To Sync With QuickBooks for Customers and Jobs?
By checking the 'Send to QuickBooks' checkbox next to a status in your workflow, you determine when a job or contact is sent to QuickBooks.
Overview
Learn how to configure your workflows to sync with QuickBooks for both customers and Jobs. The status that is checked is a trigger that will send the record to QuickBooks. To prevent lost leads from ending up in QuickBooks, users typically do not send jobs in a ‘lead’ or ‘estimating’ status to QuickBooks. Often the ‘sold’ status is the first to trigger a QuickBooks sync to ensure that the contact is indeed a paying customer.
Please note: Once a job syncs to QuickBooks, all transactions associated to that job that are not in a 'draft' status will also be sent to QuickBooks.
Where to find QuickBooks Workflow settings:
-
Click on your profile icon or initials in the top right corner
-
Select Settings from the dropdown menu
- Look under Workflows & Fields
-
Navigate to either the Contact or Job Workflow tab
-
Hover over the ellipsis ••• icon and click Edit

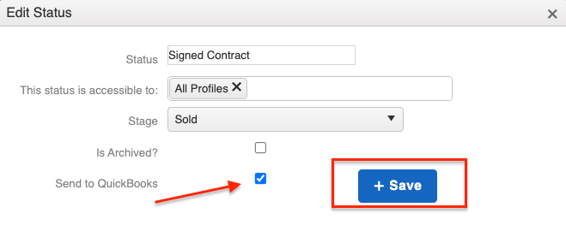
To edit the ‘Send to QuickBooks’ box:
- Hover over the ellipsis ••• icon again on the chosen status and click Edit

- Check the box next to "Send to QuickBooks"
- Save Status

You will want to verify the ‘Send to QuickBooks’ status of both Contact and Job workflows.
A job cannot sync to QuickBooks unless the Parent Contact has also synced to QuickBooks. All Jobs will have to be assigned a Parent Contact to sync to QuickBooks.