On This Page
Note: In order to use Template Fields, you must first create a template. For information on creating Templates, click here.
Template Fields
In your template builder, select the Insert Template Field button in the toolbar.
Within the dropdown menu, there are several options; each of these will allow you to pull information from your Contact or Job fields.
For example, by choosing Contact > First Name, the template will plug in a shortcode {{ContactFirstName}}, which will pull the first name of the Contact for whom you are creating the document to that spot in the body.
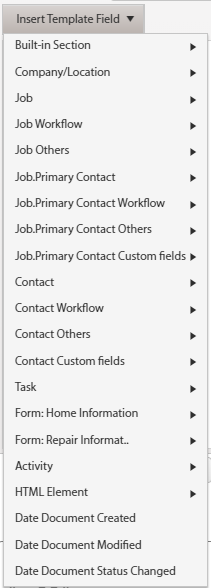
- Built-in Section: Options in this group will allow you to add in information such as a Signature Area, Estimates, and information such as Related Contacts and Document or Photo Attachments.
- Job: These options are separated into various groups, which will allow you to pull information such as Job location details, Custom Job Fields, information from the Workflow, and even data from the Job's Primary Contact.
- Note: If you are building a Document that will be created under a Job, but you need to include their Parent Contact's information, use the "Job.Primary Contact" options.
- Contact: There are several groups for Contacts. These options will allow you to pull information such as general Contact details, Custom Contact Fields, and details from your Contact Workflows.
- Task: Include details such as the Task's Assignee, Start and End Date, as well as Related Records.
- Template Questions: These groups start with "Form:" and then include the name of your Template List. Learn more about this feature here.
- Activity: Include a breakdown of the happenings listed under a record's Activity tab.
- HTML Element: Add interactive Checkboxes and Tables, with or without visible borders.
You can include several of these fields in your template, and place them wherever you need the template to plug the related information.
Keep in mind that the type of record under which you create a Document using your template of choice determines which Template Fields you should use.
Example:
If I want to create a Document under a Job record and want to include "Address Line 1" of said Job, I would use the shortcode , which can be plugged by choosing Job > Address Line 1.
If I then use this template for a Contact, the spot where the shortcode was added will be empty; I would need to choose Contact > Address Line 1 for it to pull a Contact's address information.
Troubleshooting Template Fields
If you find that you are having trouble with your Template Fields showing a blank space when you try to use it, make certain that you are selecting them from the Insert Template Fields list. If the field is manually typed or copied and pasted instead of selected from the dropdown, it may cause it not to function properly.
Additionally, please note that Template Fields cannot be customized as the system does not know what to pull in from a self-created field.
If your template fields are not pulling in the proper information, make certain that you are selecting the correct Template Field from the list. The most commonly used Template Fields and their uses are listed below.
"Job.Primary Contact" Template Fields
Choosing a field from the Job.Primary Contact options will pull the selected details from the primary contact record of the job under which the document is being created.
Example: In this example, there is a job called "job test" whose primary contact is "Jane Tester".
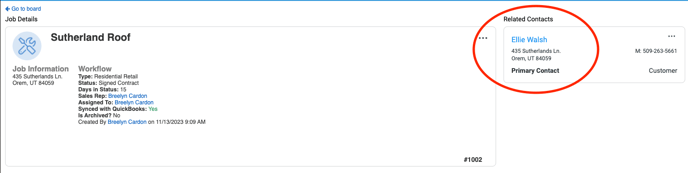
You can create a document under the Job using a template that includes the field {{JobPrimaryContactDisplayName}} .

Upon creating this document for the Job, the display name Jane Tester will populate where the field has been added, since that is the name of this primary contact.

"Job" and "Contact" Template Fields
Choosing a field from either the Job or Contact options will populate information specific to that Job or Contact.
Example:
If you would like your Contact's display name to populate when using a template, select the Contact option from the dropdown, then select the Display Name option. This will populate the code {{ContactDisplayName}} into the Template.

Upon creating this document for the Contact, the display name of the Contact will populate where the field has been added since that is the name of this contact.

Summary:
- Contact-specific template fields will only populate information if the document is being created under a contact.
- Job-specific template fields will only populate information if the document is being created under a job.
- Job.Primary Contact-specific template fields will only populate information if the document is being created under a job with an associated primary contact.
"Task" and "Activity" Template Fields
These two types of Template Fields can only be used in Email Templates that are sent out by an Automation triggered by either a task or recorded activity.
Example 1:
- Creating an event-based automation to send an email out that contains details of a task that has been created. The email template you use for the automation will include the task's start date.

- With the Task creation being the Automation's "triggering event", the email that is sent out will contain the triggering task's start date, as anticipated. Under the Activity tab of the Task, you can see the body of the outbound email as well as the event that triggered the Automation.

Example 2:
- Creating an Event-Based Automation to send an email out when a certain type of activity has been created under a Job or Contact record.

- The email template you use will contain the name of the user who created the activity, as well as the date the activity was created.

When adding a note to a customer's record, select the type you want specified as the Automation's condition in order for the email to send out.

Under the Activity tab of the record under which the note was added that met the conditions of the previously created automation, you can now see an outbound email that contains the contents of the activity-specific template fields used.

"Work Order" Template Fields
Much like tasks and activity, Work Order-specific fields can only pull information if a work order triggers an automated email.
Example:
- If you want a team member to receive an automated email containing details of their assigned work order once it has been created. The email template you use for the automation will include the work order's start date.

The email template used will contain the name of the user who is assigned to the work order as well as the work order's start date.

This is the only way Work Order details can be plugged into a Template using short codes. Document templates are not compatible with Work Order Template Fields.