What Can I Do on a Contact’s Page in the Mobile App?
Navigate your customers' records on the go.
On This Page
For iOS
When viewing the page of a Contact, you can:

- Add details to the Contact by making a selection from a drop-down menu, such as:

- Edit the Contact's information.
- Change the Contact's Status.
- Call the Contact.
- Once your phone call has ended, you will be prompted to leave a Note, which will automatically populate the following information:

- Select the @ icon toward the bottom of the note to mention a team member, type out additional context if needed, change the note type to categorize it as something other than "Phone Call", and then click save to log the activity.
- Once your phone call has ended, you will be prompted to leave a Note, which will automatically populate the following information:
- Text the Contact.
- If you do not have Engage set up, you will be directed to your device's native messaging app instead of the Engage tab.
- Email the Contact.
- You can use Email Templates that have been designed in the Web App, add attachments, and B/CC additional recipients on the conversation. Once you send the email, it will be recorded under the Contact's Activity Feed.
- Get directions to the Contact's address by tapping the Map icon.
- Create a new Job (if enabled) to associate with the Contact.
- Review the Contact's details, such as their address, phone number, and Workflow Type.
- Select Activity to review the Contact's Activity Feed, ordered by most recent events.
- Status changes, inbound and outbound emails, notes, automated activity, and more are recorded here. Learn more about logged Activity here.

- Status changes, inbound and outbound emails, notes, automated activity, and more are recorded here. Learn more about logged Activity here.
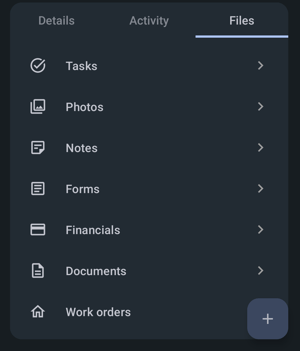
- Select the Files tab to see the following options:

- Tasks
- Photos
- Notes
- Forms
- Financials
- Documents
- Work Orders
For Android
When viewing the page of a Contact, you can:

- Manage or edit the Contact's details, including updating their name or any other information present.
- Update the Contact's Status.
- Call the Contact.
- Once your phone call has ended, you will be prompted to leave a note, which will automatically populate the note with the phone number and the length of the call.
-jpg.jpeg?width=345&height=668&name=tempFileForShare_20240627-143610%20(1)-jpg.jpeg)
- Select the @ icon toward the bottom of the note to mention a team member
- Change the note type to categorize it as something other than "Phone Call"
- Toggle the Private button on or off
- Click save to log the activity.
- Once your phone call has ended, you will be prompted to leave a note, which will automatically populate the note with the phone number and the length of the call.
- Text your Contact using the Engage feature or your build in device messenger.
- Email the Contact.
- You can use Email Templates that have been designed in the Web App, add attachments, and BCC/CC additional recipients on the conversation. Once you send the email, it will be recorded under the Contact's Activity Feed.
- Get directions to the Contact's address.
- Your device's primary navigation app (i.e. Google Maps) will open and populate the customer's address when you click on this icon.
- View the Contact's related records
- Review the Contact's details, such as their address, phone number, and Workflow Type.
- Select Activity to review the Contact's Activity Feed, ordered by most recent events. Status changes, inbound and outbound emails, notes, automated activity, and more are recorded here. Learn more about logged Activity here.

-
Select the files option to reveal the following tabs:

- Tasks
- Photos
- Notes
- Forms
- Financials
- Documents
- Work Orders
- Open the Contact's menu.
- From here, you can add a Task, relate a new Job (if enabled), relate a new Contact, add a Note, submit a Form, use the naturalForms integration, take or upload a photo, and create Financial documents.