Warning: Records will be created during the sync process. This cannot be undone. Disconnecting the sync after it is in place will not remove the records that were created by this process. We recommend using one of our integration specialists to help with this setup. Please reach out to our support team at support@jobnimbus.com to schedule a time.
We recommend updating to the most current version of Windows prior to syncing with QuickBooks Desktop as some security protocols on older versions will not allow you to sync.
Please note: The sync setup process for QuickBooks Desktop can take 45 minutes to several hours to complete. How long it will take depends a great deal on how quickly your web connector runs.
It does not have to be completed all at once. You can start the setup process and return to it as you have time to do so.
The supported QuickBooks Desktop versions are:
-
Enterprise Edition
-
Pro
-
Premier
-
Simple Start
All versions must be currently supported by Intuit. Older versions no longer supported by QuickBooks will not be able to sync.
QuickBooks Mac edition is not supported due to the inability to add the JobNimbus Application to the Web Connector (the program that transfers the data).
Certain aspects of non-US versions are unsupported, tax types must be tax or non for the code on the sales tax code list (Canadian versions do sync, but may require that invoices and estimates originate in QuickBooks to assign the correct tax code).
Before syncing, please do the following:
-
Create a backup of your QuickBooks
-
Ensure that your QuickBooks settings are properly set up in your workflows: QuickBooks Workflow Setup
-
Decide which direction you would like to sync:

Please note: all record types must sync using a single sync type. You cannot sync contacts with a 2-way sync, and sync invoices using a one-way.
- Estimates and tax rates are exceptions. Estimates will sync one-way from JobNimbus to QuickBooks. Taxes will sync from QuickBooks to JobNimbus.
-
If you currently have active Customers in QuickBooks and active Contacts in JobNimbus please read this article regarding display names: Contact Display Name
-
If the display name between a contact in JobNimbus and a customer in QuickBooks are identical, then the two records will link during the sync. If they are different in the slightest degree, then duplicates will be created.
-
-
If you have a lot of historical data in your QuickBooks file, please consider making the older records ‘inactive’. Records cannot sync if they are inactive. Syncing over a few thousand records will not only greatly increase the amount of time the setup takes, but can also cause the Web Connector to freeze up. This may result in an unmanageable error log.
Extremely large QuickBooks files will require a very fast internet speed to keep the web connector from freezing when syncing for the first time.
Syncing to QuickBooks
- Enable the QuickBooks feature in your JobNimbus settings (If you already see a tab in your settings that says QuickBooks, skip to step 2)
- Initiate the sync Process:
-
Select the QuickBooks tab on the lefthand side of your settings
-
Underneath where it says, "Which QuickBooks platform are you using?" select the QuickBooks Desktop radio button
-
Confirm your Workflows: QuickBooks Workflow Setup
-
Do not select the “I have more than one QuickBooks Company file” unless you plan to sync your JobNimbus to multiple QuickBooks files. Review the following article for more details: QuickBooks Desktop: Multi-location syncing
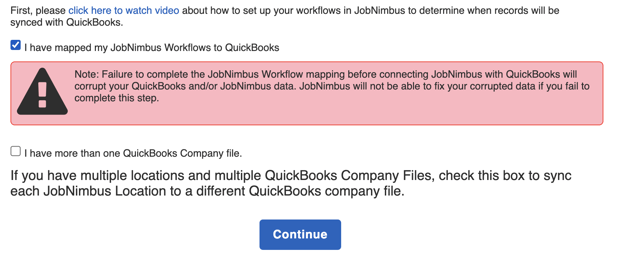
- Hit Continue
-
-
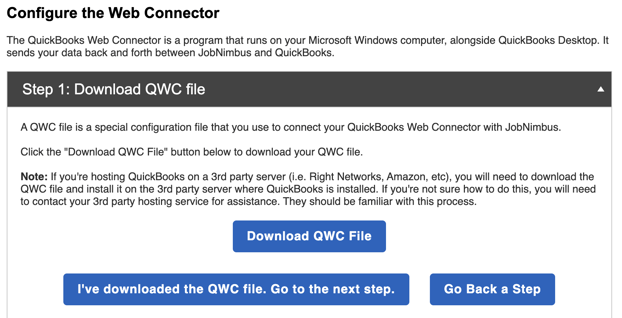
Select Download QuickBooks Web Connector File
-
The QuickBooks Web Connector file is a unique file that you will load into your QuickBooks Web Connector and will download to your ‘Downloads’ folder. We recommend keeping this file in a dedicated folder like in your company file folder. Should you misplace this file, it may cause troubleshooting issues.
-
If QuickBooks is on a server, you may need to log into JobNimbus from the server and download the QuickBooks Web Connector file to the server itself.
-
-
Open the QuickBooks Desktop file that you wish to connect. You will need to login as an Admin and in ‘Single User Mode’ (can be switched in File at the top of the QuickBooks page).
-
Click File → App Management → Update Web Services
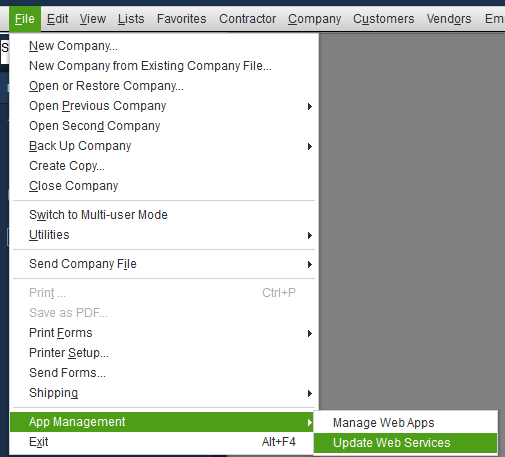
- Select Add an Application
.png?width=624&height=415&name=Step%206%20Add%20Application%20(1).png)
- From your computer’s file manager, navigate to and select the previously downloaded QuickBooks Web Connector file (often found in the "Downloads" folder). Select Open.
.png?width=545&height=313&name=Step%207%20%20(1).png)
-
Please note: if you get a QuickBooks Web Connector 1003 error, simply hit YES to bypass it
-
-
A new window will pop up titled “Authorize New Web Service”. Select OK
-1.png?width=545&height=532&name=Step%208%20(1)-1.png)
- A new window titled “QuickBooks - Application Certificate” will appear. Select the radio icon to the left of Yes, always: allow access even if QuickBooks is not running. Then, Continue.

- A new window titled “JobNimbus - Authorization” will appear. Select Yes.
- A new window titled “Access Confirmation ” will appear. Select Done.
-
Return to JobNimbus (leaving both QuickBooks and the web connector OPEN), and in the settings --> QuickBooks tab (you should still be on this screen): click on Step 6: Set Web Connector Password
-
Copy the password to your Clipboard (clicking the blue Copy beneath the password will automatically copy it to your clipboard)
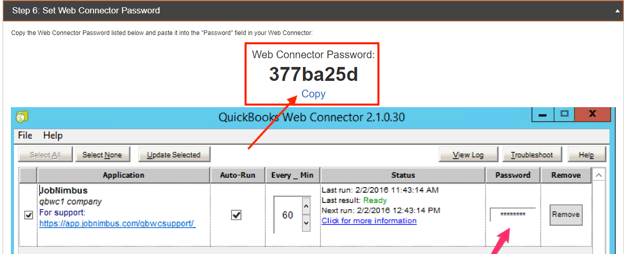
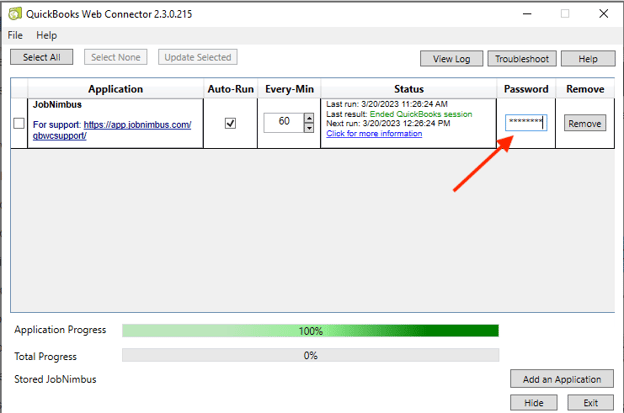
- Return to the web connector and paste this password to the password box. Click the check box next to the JobNimbus application. Confirm to save the password.
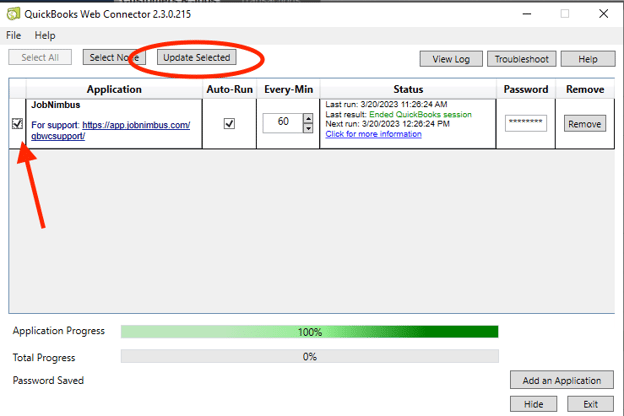
- Check the box again next to the JobNimbus application. Hit Update Selected at the top.
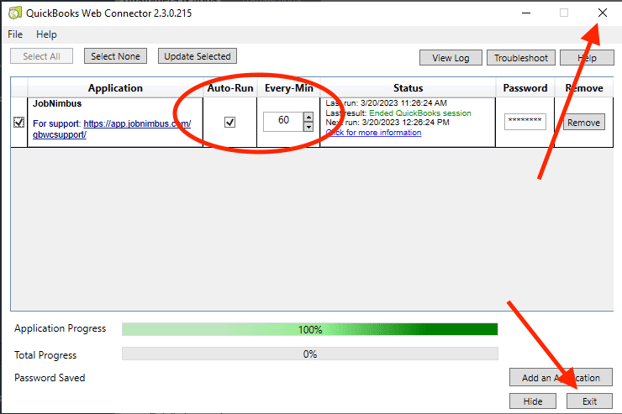
- Please note: By default, the web connector is set to auto-run every 60 minutes. If your web connector takes a long time to complete, you may find it necessary to increase this time to 90-120 minutes to allow the sync to complete before the next one starts. You may also decrease this time to 15-30 minutes if you’d like the sync to run more often but we do not recommend less than 15 minutes. The web connector can slow down your QuickBooks while it is running. Do not hit 'Exit' or the 'X' on the top of the web connector. This will close the web connector and it will not be able to sync as scheduled.
- Please note: By default, the web connector is set to auto-run every 60 minutes. If your web connector takes a long time to complete, you may find it necessary to increase this time to 90-120 minutes to allow the sync to complete before the next one starts. You may also decrease this time to 15-30 minutes if you’d like the sync to run more often but we do not recommend less than 15 minutes. The web connector can slow down your QuickBooks while it is running. Do not hit 'Exit' or the 'X' on the top of the web connector. This will close the web connector and it will not be able to sync as scheduled.
-
Once the web connector completes, return to JobNimbus and click on Step 7. Select the button at the bottom, “My Web Connector finished syncing without errors. Continue”
-
Confirm that the file path that JobNimbus will sync to is correct by clicking “Yes”.
-
Please note: If the QuickBooks file is moved or renamed in the future, JobNimbus will no longer be able to sync to it. The sync will need to be disconnected and reconnected to update to the new file path.
-
If you have issues getting to this point, please contact JobNimbus support via email at support@jobnimbus.com, or phone at 855-964-6287
Select your sync options
Now that the Web Connector is set up to sync, we need to select our sync options. Please determine which option is the best fit for your company’s business practices. The sync options page will bring up the following and are set to default preferences.
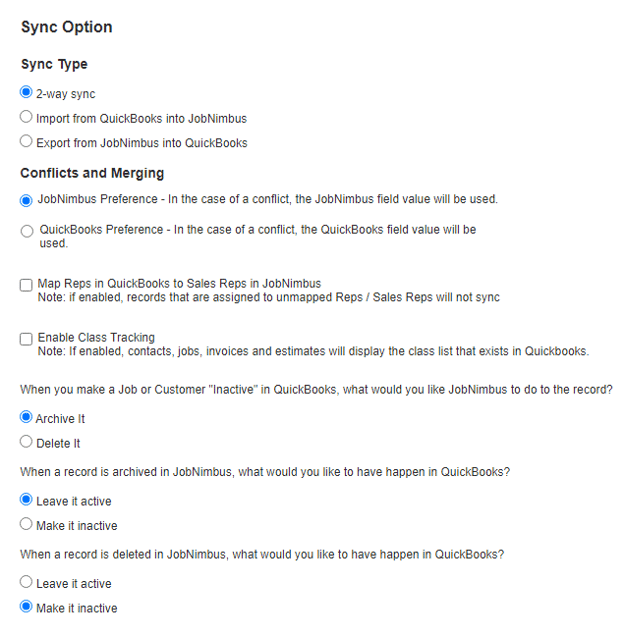
Sync Type
There are three types of sync:
-
2-way Sync
-
Import from QuickBooks into JobNimbus
-
Export from JobNimbus into QuickBooks
JobNimbus syncs with QuickBooks Desktop in a linear direction in terms of the data. If you want data flowing into each program (what is updated in JobNimbus will also update in QuickBooks and vice versa) then you will choose the 2-way Sync option. The majority of companies have their sync on a two-way. However, you can choose to have data in JobNimbus go to QuickBooks OR for QuickBooks data to go into JobNimbus (one-way sync). If you do choose a one-way sync, be aware that all updates and edits need to be done in the originating system. Editing records in the receiving system will result in mismatched records.
Conflicts and Merging
The conflicts and merging option refers to which program is given priority in a field when records are being linked (display names matched during initial sync) or edited in both systems around the same time (after the sync is in place). A field is the data that syncs. For example, ‘first name’ is a field.
You will need to choose which program you want to take priority: QuickBooks or JobNimbus? When choosing which system to give preference to, please consider which system has the most up to date information. If you do not regularly add phone numbers to QuickBooks, and records will be linking to existing records in JobNimbus, giving QuickBooks preference will delete phone numbers from your JobNimbus records.
Mapping Sales Reps and Class Tracking
These two selections are optional. Only enable if you currently have sales reps and/or class tracking setup in QuickBooks. You can also do this at a later time if needed. Refer to the following articles for further details:
After reviewing the last three questions on this page regarding making records inactive or deleting them, click the Continue button at the bottom of the page.
You will be brought to the following page:

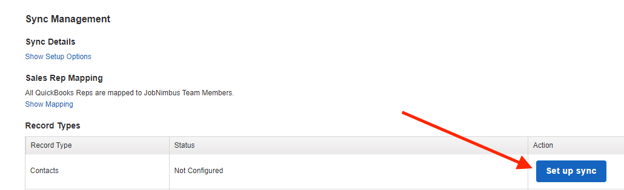
Choosing and Syncing Your Record Types
Each record type needs to be set up individually. There is a hierarchy to the sync so some records cannot be synced before others are complete. They proceed in the following order:
-
Contacts (must sync this first, then other record types will be available)
-
Vendors
-
Jobs
-
Taxes
-
Products (must sync first to continue past this point)
-
Estimates
-
Invoices (must sync first to complete sync for payments)
- Payments
-
Credit Memos
Please note: not all records are required to sync. For example, it is not necessary to sync Vendors if you choose not to. You will be able to sync the following record types without syncing Vendors. Products, however, are required to sync before any transactions can sync.
You will set up the sync individually for each record type. Note: This can be a tedious process. How quickly the web connector completes determines how long the process will take. Please feel free to take breaks between setting up record types.
Syncing Contacts, Vendors, and Jobs (if applicable)
-
Choose “Set up Sync” for Contacts.
Here you have the option to choose how much data is passed between the systems. Note that inactive customers in QuickBooks will not sync. You have the option of constraining the data coming from JobNimbus as well as data coming from QuickBooks. You can choose to:-
Import all data
-
Import no records today
-
Import recently modified data (1 month =>60 months)
Please note: for optimal performance of the sync we do not recommend syncing more than a few thousand customers from QuickBooks. If you have more active customers than this in QuickBooks, we advise you to choose a time constraint.
-
- Choose what Workflow Type and Status you would like to assign to contacts that are being created in JobNimbus from QuickBooks. Once the new contacts are created in JobNimbus you can assign them to whichever status you would like.
.png?width=512&height=454&name=Syncing%20Step%202-3%20(1).png)
-
Click on “Save and Preview Changes” at the bottom of the screen. You will see the pink Web Connect Sync screen in JobNimbus. It will stop circling after you run the sync.
-
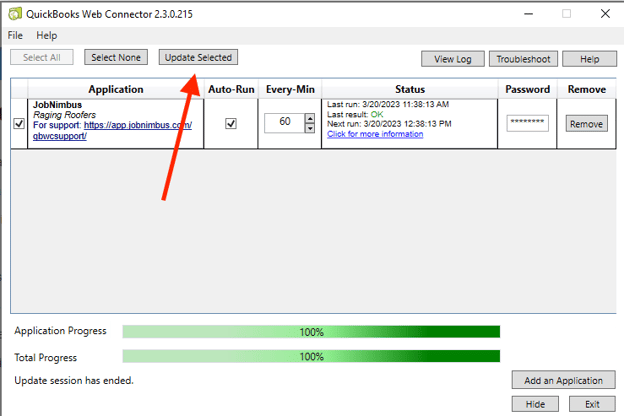
Open the web connector and click the “Update Selected” button at the top.
- When the web connector completes, return to JobNimbus. You will find a preview screen that will tell you which records will be linked and which will be created new in each system. Please review each of these reports by clicking ‘View Records’ to ensure that duplicates are not being created. Remember: contact records will link by the display name. This display name must be identical in each system or duplicates will be created. You can hit the “Go Back’ button at this point and no records will be synced.
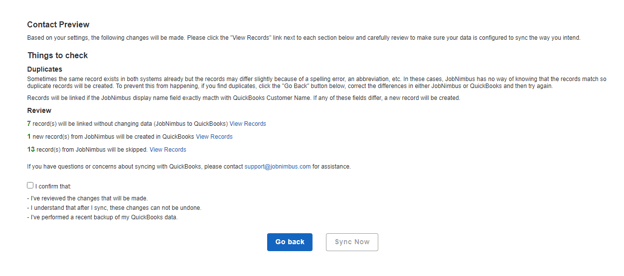 Once you review the reports, click the box next to ‘I confirm that…’ and then hit ‘Sync Now’
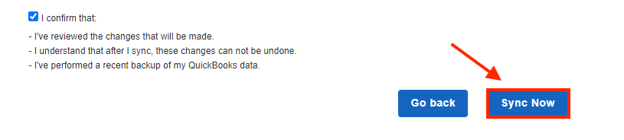
-
Open the web connector and click the “Update Selected” button at the top.
Tip: If the web connector reaches 100% and you find that in JobNimbus it keeps circling but is not stopping, or seems frozen. Try refreshing the screen. -
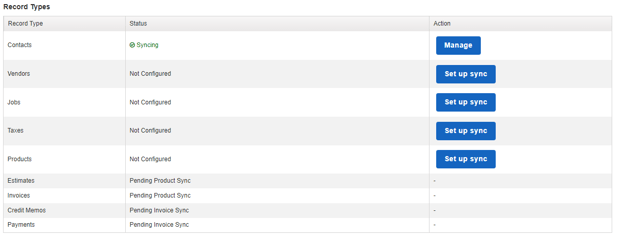
Now that Contacts have synced, you will see a green “Syncing” in the status next to Contacts. You will also notice that Vendors, Jobs, Taxes, and Products are all ready to set up.
If the pink box showed up at the top of the page, it does not mean that the setup process cannot continue. Records in this report were not able to sync. You can review and correct these now or after the syncing process is complete.
If you choose to sync Vendors, click on ‘Set Up Sync’ for Vendors and repeat the steps above.
If you use Jobs, you will need to sync them, or else invoices and estimates created through their records will not sync. Click on ‘Set Up Sync’ for Jobs and repeat the steps above.
Syncing other Record Types
To sync other record types, proceed by selecting Set Up Sync.
-
Timing: You do not have to sync everything at one time. You can sync contacts, then at a later date, sync vendors, for example; you choose what is best for your business.
-
After selecting Save and Preview Changes for each record type, you will need to return to QuickBooks Web Connector to select "Update Selected.”
-
Be sure to review new records! If new data will be added, it will show on the preview screen. Make sure you select "view records" to see what will change and to ensure that records are not being duplicated.
Products & Services
-
All active Products and Services (Items) will sync. These must sync in order to sync any transactions.
-
You will be able to choose which income account new Products from JobNimbus will be assigned in QuickBooks
-
All products from JobNimbus will be assigned the type “Service” in QuickBooks. QuickBooks will not allow you to change the type once created. If you need to create “Inventory” type items, they will need to be created in QuickBooks.
Taxes
-
Tax rates must originate from QuickBooks. They will import into JobNimbus into the Taxes section within Settings.
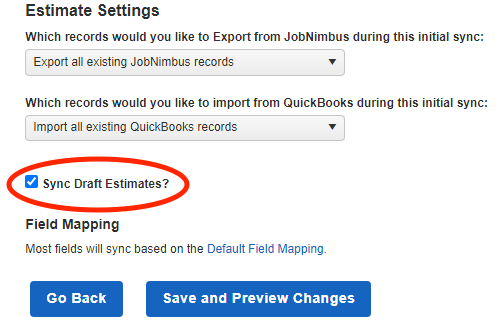
Estimates and Invoices
-
You will have the option to constrain your data by time if you wish. You will also have the option to sync the “Draft” status. When you create a new invoice or estimate, it will be in the status of Draft. If you leave this box checked, then the transactions will be able to sync in this status. If you uncheck the box, then the record will not sync to QuickBooks until it moves to any other status.
Syncing Credit Memos
-
Credit memos can be used when needing to issue a refund to a customer or to reduce the amount owed on an invoice for any reason.
-
You do not have the option to put a time constraint on credit memos, but if they are attached to an invoice and that invoice has not synced, then the credit memo also cannot sync.
Syncing payments
-
You will need to map your payment methods between the two systems.
-
Each payment method used in QuickBooks will need a JobNimbus payment method assigned to it.
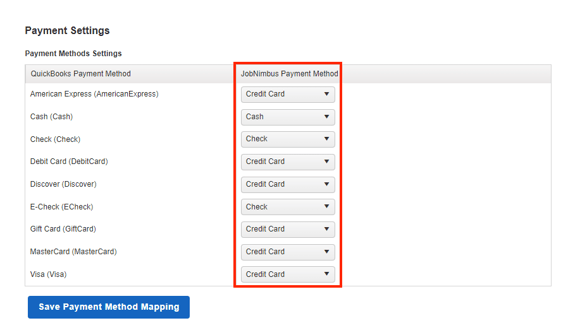
-
Once complete, hit ‘Save Payment Method Mapping’.
-
Choose any time constraints you wish for payments.
-
Hit ‘Save and Preview Changes’ and ‘Update Selected’ on the web connector.
Your Sync is now Complete!
- Review any records that could not sync. They can be found in your Sync Error Report in JobNimbus --> Settings --> QuickBooks tab --> "Show Sync Errors".
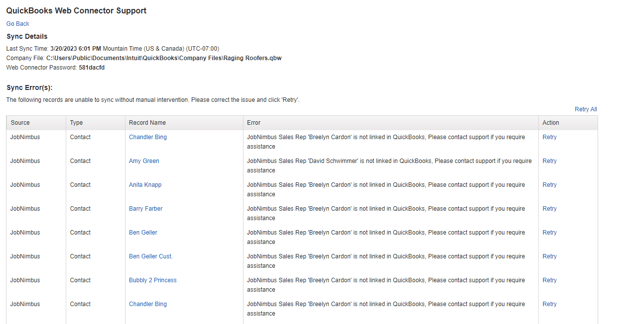
- Once you correct the issue on these records, click on the blue ‘retry’ for that record. It will then try to sync again the next time the web connector runs.

What now?
- Try to leave QuickBooks stored where it is. Moving it to a new computer or a different file on the computer will change the file path that JobNimbus is syncing to and will break the sync. If QuickBooks does need to be moved, it will require a complete disconnect and reconnect of the sync to do so.
-
Please leave the web connector open. We set it to auto-run but this can only happen if the web connector is open. If you shut it down, it cannot run. If your QuickBooks is on a server, it may shut down the web connector when you log off the server. If using Right Networks or other 3rd party servers, it may be impossible to get the auto-run to work due to the fact that it logs you out after a certain period of time.
-
You can see if the auto-run is working by checking the time stamp in JobNimbus --> Settings --> QuickBooks tab (please note that the date is accurate, but the time is always 5-7 hours fast)
