![JN_Logo_Long-White@1x.png]](https://support.jobnimbus.com/hs-fs/hubfs/JN_Logo_Long-White@1x.png?height=40&name=JN_Logo_Long-White@1x.png)
On This Page
- What is the difference between Estimate Layouts and Estimate Templates?
- Accessing Estimate Settings
- Estimate Layouts Overview
- Creating a New Layout
What is the difference between Estimate Layouts and Estimate Templates?
- Estimate Layouts are the framework for your whole estimate, such as what pages are included. Whereas Estimate Templates are templates of individual Estimate pages that you have previously created to use repeatedly in future estimates.
Accessing Estimate Settings
- For Users with Settings access:
- To access Estimate Settings, click on your profile icon or initials in the top right corner. Then, select Settings from the dropdown menu.
-
- In the Settings menu on the left side of the page, select Estimate Settings.
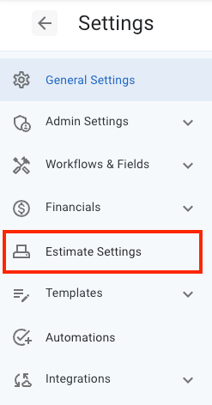
- In the Settings menu on the left side of the page, select Estimate Settings.
- For Users without Settings Access:
- Go to any Contact or Job, select the Financials tab, and then select the gear icon to access the Estimate Settings.

- Go to any Contact or Job, select the Financials tab, and then select the gear icon to access the Estimate Settings.
Estimate Layouts Overview
Once in your estimate settings, select Estimate Layouts to begin. Here you can:
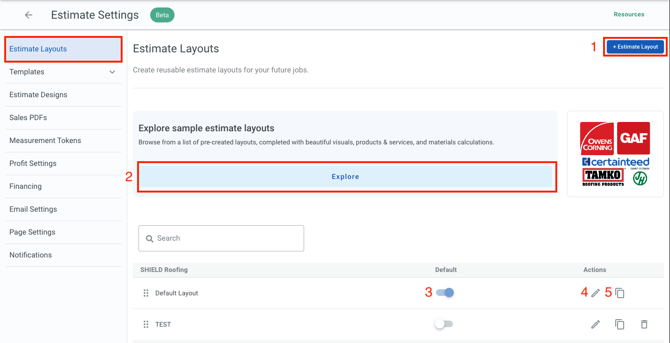
- Add a New Layout.
- Create a template from the Layout Library by selecting the Explore button.
-
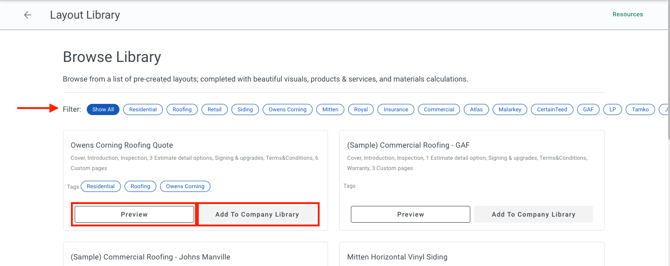
- In the Layout Library, you can filter the layouts showing by selecting options from the Filter section.
- Preview the layout by selecting the Preview button.
- Add the selected layout to your library to use by selecting the Add To Company Library button.
-
- Set a new default Layout by toggling the Default button on so that it shows in blue.
- Edit an existing layout by selecting the pencil icon.
- Copy an existing layout by selecting the copy icon.
Creating a New Layout
Once you have chosen how you would like to add a new layout (starting from scratch, selecting a layout from the Layout Library, or editing or copying an existing layout), you can begin creating your layout.
- First, give your Layout a unique name by typing into the Estimate Layout Name text box. Then, select the Location you would like to create the Layout for, and then click the Create layout button.
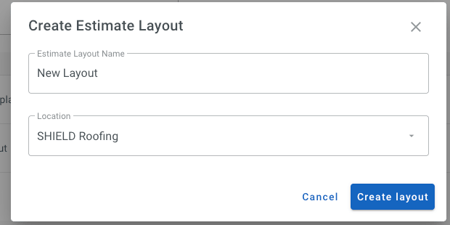
- Just like when creating an Estimate, here you have the opportunity to customize the appearance and style of your final estimate presentation to your customers. The information you include in the Layout will automatically populate when you choose it for creating an estimate, ultimately saving you time down the line.
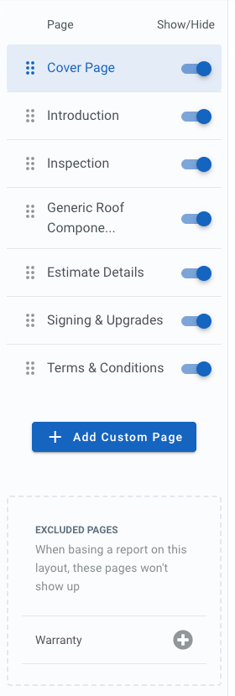
When editing or creating a layout, you can:
- Toggle pages off and on to control which pages will show on your estimate.
- Remove pages by dragging them to the excluded pages window. This will prevent the page from displaying when the Layout is selected.
- Rearrange pages by dragging and dropping them into the preferred order.
- Add more custom pages to the Layout to enhance its unique appearance and style.
Cover Page
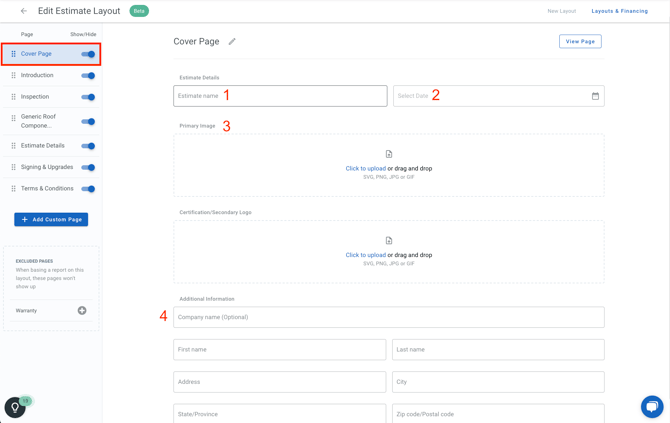
- Estimate Name - This information will appear on the front page of the final estimate.
- Date - The date field will automatically populate with the date of creation.
- Images - The main image is usually replaced with a project photo when creating the estimate. You can also choose to include a secondary photo that highlights partnerships or key aspects of your business.
-
When uploading a photo, keep your image width at exactly 650 x 414 pixels to avoid having issues with your images' size or quality.
-
- Additional Information - Here, you can fill out the your customers' information. You may also choose to leave these details blank, as they will be automatically filled in from the information in your JobNimbus Contact and Job records.
Introduction
The Introduction page can be used for a high-level overview of the work that will be done, an "About Us" page, customer testimonials for your business, and any other information you would like your customers to have up-front.
Using the options on the Introduction page, you can:
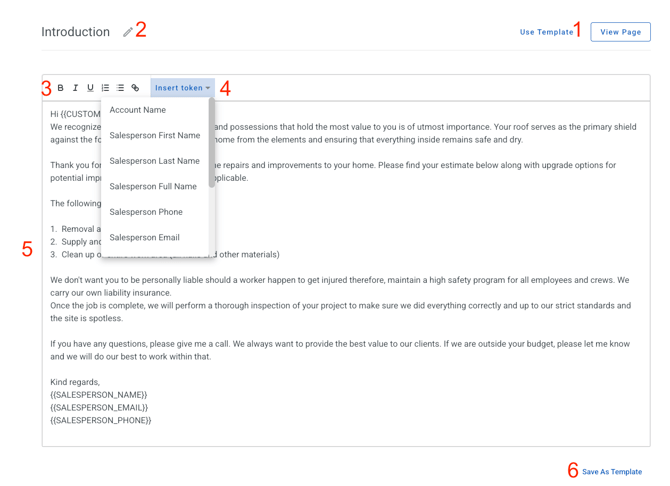
- Use a template that you have previously created for your Introduction page.
- Edit the page title by clicking on the pencil icon next to the page title section.
- Edit the text formatting, including adding bold, italic, and underlined text, numbered or bulleted lists, and adding links.
- Use the Insert Token dropdown to insert a text short code (shown as {%raw}{{TEXT}}{%endraw}) that will automatically insert the indicated information when the estimate is sent.
- You can create custom tokens by adding custom fields, which will then show as an option in the Insert Token dropdown.
- Click the text box to add and edit content on your Introduction page.
- Click the save as template button to save the Introduction page you have created for future use.
Inspection
On the Inspection Page, you can include information about what was found during the inspection phase of a Job.
On this page, you can:
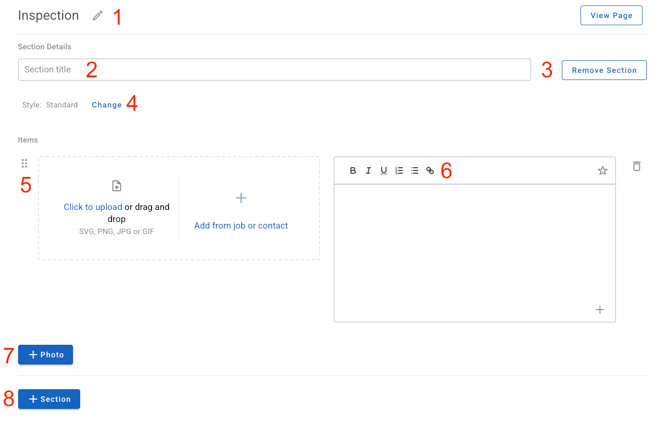
- Edit the title of your Inspection page by clicking on the pencil icon.
- Edit the Section title.
- Remove a Section.
- Change the layout style of the photos and description section by clicking the Change button.
- From here, you can select from the available page styles as shown below. Be sure to select Save to save your selection.
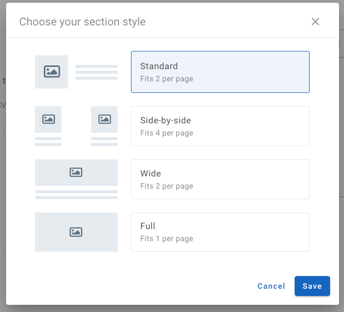
- From here, you can select from the available page styles as shown below. Be sure to select Save to save your selection.
- Add photos by uploading them from your device or adding them from your Job or Contact.
- Click and drag the six dots on the left of an item to reorder your photos.
- Click the pencil icon under your photo to edit it.
- Note: If the browser window that you are running JobNimbus on is too small or zoomed in too far, the pencil icon may not appear. To resolve this, simply expand your browser window or zoom out.
- Add a description of the item.
- Add an additional photo.
- Add an additional section.
Estimate Details
The Estimate Details section is where you can provide the details of the estimate for the work you are proposing to the customer. On this page, you can:
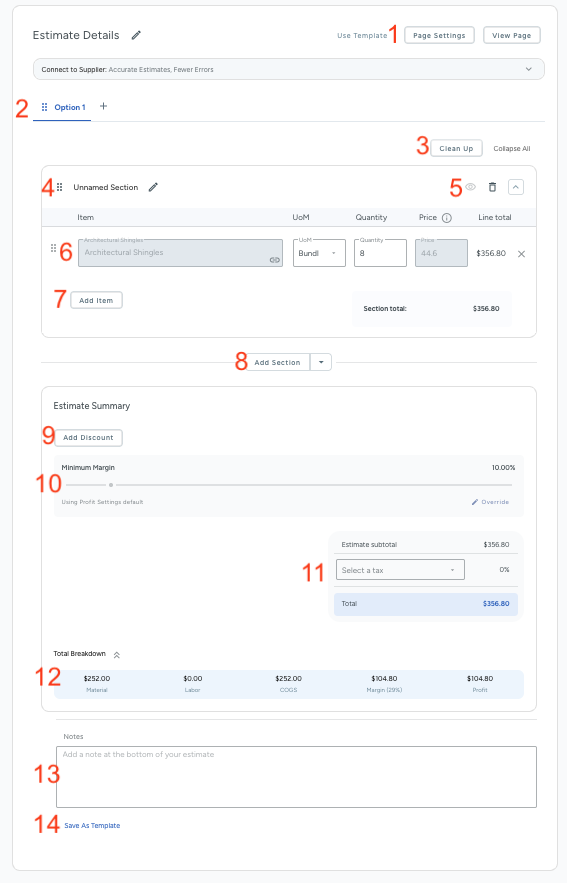
- Click on the Page Settings button to change how your Estimate Details page will appear.
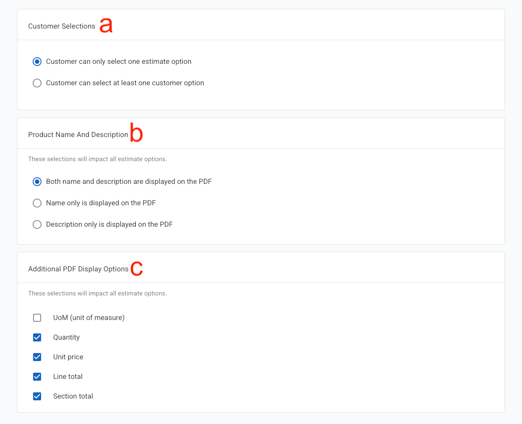
- Choose if you would like your customer to be able to choose only one option from an Estimate or multiple options.
- Select how you would like your products' names and descriptions to display. You can choose from displaying both the name and description, the product name only, or the product description only.
- Select from this list to display additional information on your Estimate PDF.
- Add and edit Estimate options. You can have a maximum of three estimate tabs. This can be used to show a good/better/best estimate or multiple trades such as a roofing/siding/gutters estimate to customers.
- To do a good/better/best estimate you can use the option to "include all items from" eliminate needing to do any double entry.
- Clean up items without a quantity added.
- Edit the Section name.
- Hide or show sections on the final Estimate PDF by clicking the eye icon, delete a section by selecting the trashcan icon, and collapse or expand sections by clicking on the up or down arrow in the top right corner of the section.
- Add line items to your Estimate.
- Line item details will sync from your Products and Services in JobNimbus Settings. Items can be easily reordered by clicking the six dots to the left of the item and dragging it into position.
- Add more items by selecting the Add Item button.
- Add new sections by selecting Add Section.
- If you have previously saved estimate details templates, a new section can be included from a saved template as well.
- Add a discount by selecting the Add Discount button.
- Use the Override Minimum Margin button if different work types need different minimum margins (e.g., new construction vs. repair), you can override the global minimum margin setting on individual layouts and templates.
- Apply a Tax rate.
- View a total breakdown of your Estimate.

- Add a Note to the bottom of your Estimate.
- Save your Estimate as a Template to be used for future Estimates.
- Important: After editing a layout to link products to calculations, you must publish the layout changes before they apply to new estimates. If products appear linked in layout settings but calculations aren't firing, check whether the layout has unpublished changes.
- Ad-hoc items added directly to a layout (not selected from Products & Services) will not connect to calculations regardless of publishing status.
Signing and Upgrades Page
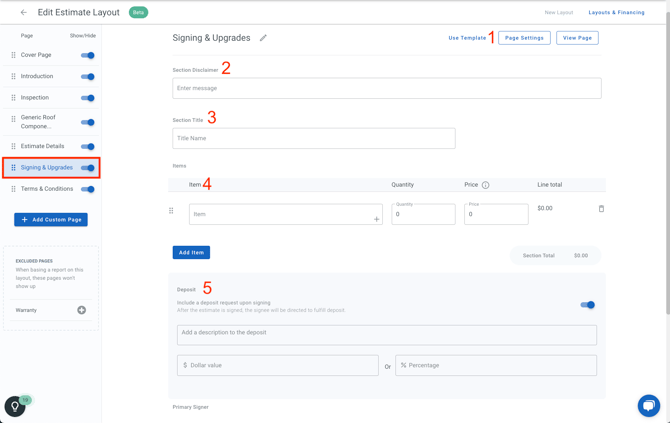
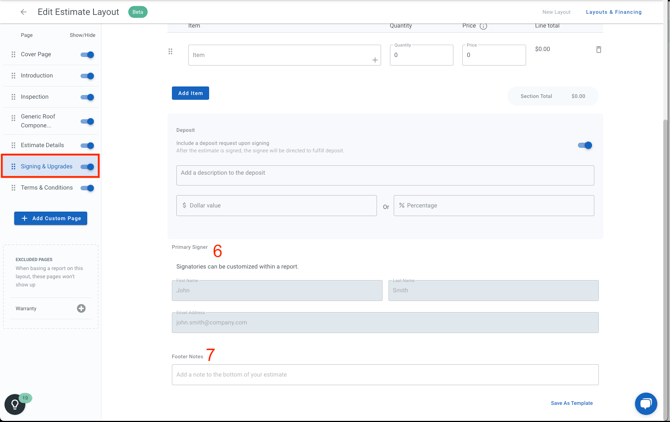
- Page Settings: Here, you have the option to choose whether to display the unit price and quantity to the customer for any additional upgrades added later on the page.
- Section Disclaimer: This section can be utilized to include any terms or instructions related to the estimate that the customer or insurer may need to review.
- Section Title: Add a title for your section, such as "Roofing Tear Off" or "Materials and Labor".
- Items: Add line items to have on your layout by default each time you create a new estimate. Choose from linked items in your price list or manually create fixed priced items.
- Deposit: Choose to add a Deposit and include a description, and a dollar amount or percentage for the amount you would like the payment to be.
- Signers: Add required signers to your Estimates when you are sending live documents. No updates are needed while creating the Layout as these details will be added when you are with your customer.
- Footer Notes: Use this section to add additional details for your signers if needed.
Terms and Conditions
In the Terms and Conditions section, you can add the specifics of your agreement with your customer. Here, you can:
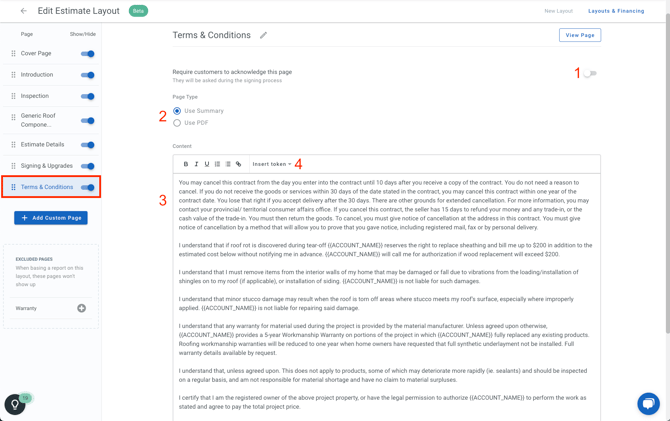
- Require customers to acknowledge this page: Require your customer's acknowledgment during the signing process by toggling the option on (the toggle will show blue when the option is on).
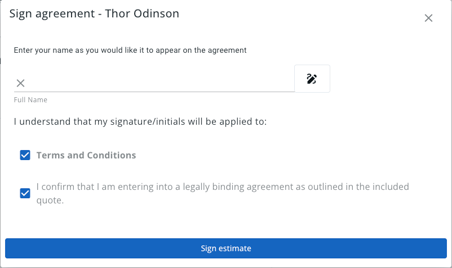
- This will trigger the dialogue box below to have the Terms and Conditions checkbox when the customer is signing your agreement.
 Page Type: Select the Use Summary option to type your document into the document builder or upload your Terms and Services as a PDF from your device by selecting the Use PDF option.
- Content: Enter your text if typing your document or preview your PDF document if you choose to upload it as a PDF.
- Insert Token: Use the Insert Token option to have Contact and Job information automatically populate when generating your document. These fields will show as bracketed short codes (ex. {%raw%}{{ACCOUNT_NAME}}) in your layout, but will pull the individual information once the document has been generated and sent.
Warranty
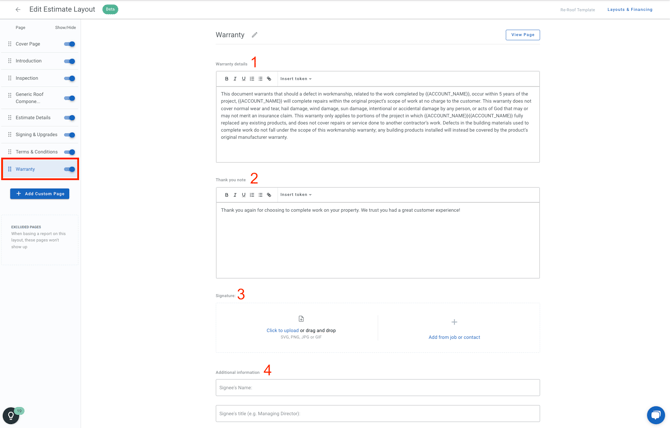
- Warranty details: Enter your Warranty information in the Warranty details text box. Use the Insert Token option to have Contact and Job information automatically populate when generating your document.
- Thank you note: Enter text to include a personalized thank you note. You can also utilize the Insert Token option here.
- Signature: Include a company or representative signature by uploading an image of the signature along.
- Additional Information: Enter the Signee's name and title in the respective fields.
Add Custom Pages
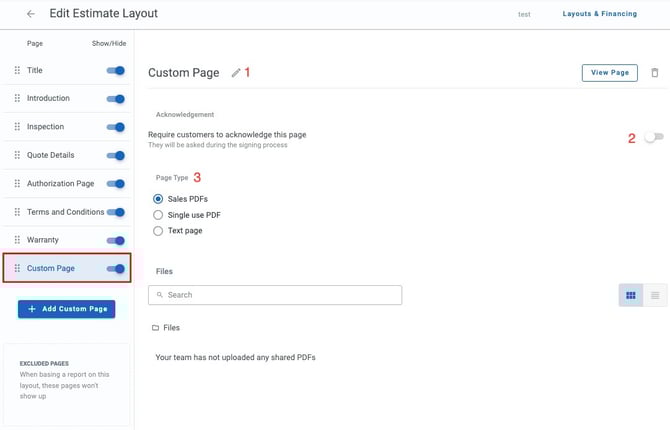
- Title: Give your custom page a unique name in order to keep your document organized.
- Require customers to acknowledge this page: Require your customer's acknowledgment during the signing process by toggling the option on (the toggle will show blue when the option is on).
- Page Type:
-
- Sales PDFs: If you have previously uploaded PDFs to your account, you can choose the desired file from your saved library.
-
- Learn more about how to add Sales PDFs here.
-
- Single use PDF: You can easily add these files by dragging and dropping them from documents stored on your device.
-
- Learn more about how to create PDF custom pages here.
-
- Text Page: Utilize the document builder to craft a personalized document that can be saved to be used on this Layout as well as future Layouts.
- Sales PDFs: If you have previously uploaded PDFs to your account, you can choose the desired file from your saved library.