How Do I Create an Event-Based Automation?
Learn how to create an automation triggered by an action in JobNimbus.
Adding an Event-Based Automation
- Click on the three lines in the top left corner and choose Settings from the dropdown menu, then select the Automation tab.
- Click the blue +Add Automation button.

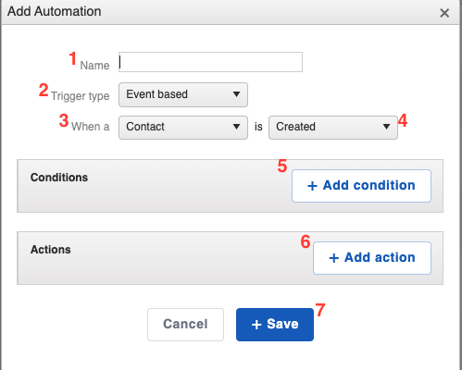
- This will bring up the Add Automation window. Here, you can:

- Name your Automation. Be as descriptive as possible so it's easy to locate in your list of Automations.
- Select the Trigger type by choosing Event-based from the dropdown menu.
- Update the Triggering Record.
- You can choose between Contact, Job, Task, Work Order, Material Order, Payment, Attachment, or Activity. Each Type will allow for different Conditions to specify how the Automation will trigger.
- Specify what action should cause the Automation to run.
- You can use this drop-down menu to choose between when the record is either Created, Modified, Created or Modified, or Deleted.
- Add a Condition.
- The system will look to make sure these Conditions are met in order for the Automation to trigger. For example, you can add a Condition for when a Contact's "Status is Lead". When a Contact is in that Status, the Automation will have permission to trigger.
- Add an Action.
- This is what is being executed once the Conditions of the Rule have been met. For example, once the Contact is in the Lead status, a Task will be created and assigned to the Sales Rep, telling them to follow up with the Contact.
- Save your Automation Rule.
For Automatic Texts: Easily add an Action to any Automation to include a text message with the Engage feature. Follow these instructions to create texting Automations.