How Do I Create Text Message Templates With Engage?
Make texting your customers faster than ever by creating text message templates using JobNimbus' Engage feature.
On This Page
- What Are Text Message Templates?
- Creating Text Templates on Web
- Creating Text Templates on iOS
- Creating Text Templates on Android
You must have both Engage and Account Settings permissions included in your assigned Access Profile in order to create text message templates.
What Are Text Message Templates?
Text Message Templates are pre-written messages that you can apply to new messages and responses. You can also include Template fields to customize your messages, allowing you to save even more time by automatically populating your messages with your customer and assigned user's information.
Note: Any team member with Engage access can use templated messages; however, only those with JobNimbus Settings access will be able to edit, create, or delete them.
Creating Text Templates on Web
Within a conversation window, click on the speech bubble icon. Any existing templates you have will appear here.
Click the + icon to create a new template.

Once you are in the template builder:

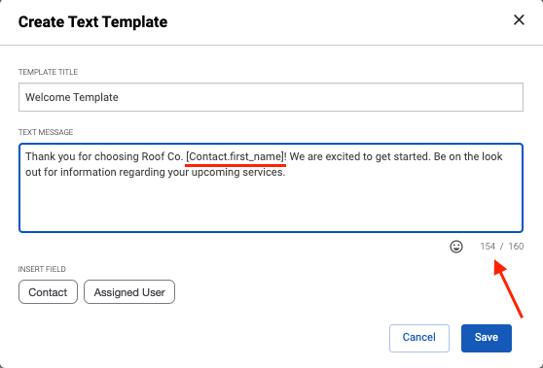
- Add a Title to your template to make it easy to find in your template list.
- Type your message template in the Text Message box.
- Click the Contact or Assigned user button to insert template fields specific to the contact or assigned user.
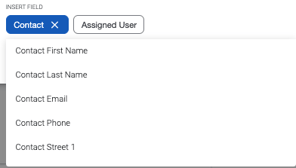
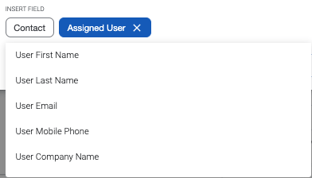
- Add emojis to the message.
- Save or Cancel your new template.
In the following example, you will see where I have inserted the field for the Contact's first name. The number at the bottom indicates how many characters this templated message will cost.
Creating Text Templates on iOS
There are two ways to access text message templates on an Apple device.
- Click on your Initials or Profile Picture in the top right corner, then select the Engage option.


- Select Template Messages when prompted. The number of existing templates will appear on the right-hand side.

- Select Template Messages when prompted. The number of existing templates will appear on the right-hand side.
- Select the Engage icon at the bottom of the app screen, then select a message thread.

- Within the message thread, select the Template icon (the speech bubble with a star in the middle).

- Within the message thread, select the Template icon (the speech bubble with a star in the middle).
Once you have navigated to your message Templates, click the blue + in the top right corner to compose your template.

Once you are in the template builder:
- Add a Title to your template to make it easy to find in your template list.
- Type your message template in the Text Message box.
- Click the blue {} Insert Field button to add fields for Contacts or Assigned Users.
- Select the Contact or Assigned User button to insert template fields specific to the Contact or Assigned User. These fields will insert the relevant information when a message is sent containing them.
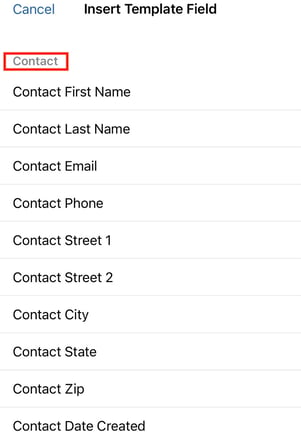
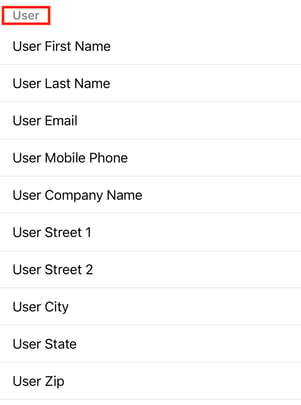
- Select the Contact or Assigned User button to insert template fields specific to the Contact or Assigned User. These fields will insert the relevant information when a message is sent containing them.
- Save the template when you are finished.
Creating Text Templates on Android
There are two ways to access text message templates on an Android device.
- Click on your Initials or Profile Picture in the top right corner, then select the Engage option.


-
- Select Template Messages when prompted. The number of existing templates will appear on the righthand side.

- Select Template Messages when prompted. The number of existing templates will appear on the righthand side.
- Select the Engage icon at the bottom of the app screen, then select a message thread.

- Within the message thread, select the Template icon (the speech bubble with a star in the middle).

- Within the message thread, select the Template icon (the speech bubble with a star in the middle).
Once you have navigated to your message Templates, click the New template message button in the bottom right corner.

Once you are in the template builder:

- Add a Title to your template to make it easy to find in your template list.
- Type your message template in the Text Message box.
- Click the blue <> Insert Field button to add fields for Contacts or Assigned Users.
- Select the Contact or Assigned User button to insert template fields specific to the Contact or Assigned User. These fields will insert the relevant information when a message is sent containing them.


- Save the template when you are finished.
Review the articles linked below to learn how to navigate Engage through your JobNimbus account: