What Are the Different Components of a Board?
Identify the important features that make up a Board on JobNimbus Web and Mobile.
On This Page
Overview Video
Watch the video below to see a brief explanation of how to create and edit boards.
Boards on Web
Lists
Note: To edit a board, you will need an Admin Access Profile. An Admin will need to go to Team under the Admin Settings to change this for users.
The columns within a Board are called Lists. The Status(es) you assign to each List will determine what Jobs are visible.
To configure a List, select the 3 dots at the top of the Board you are viewing and click Edit.
Then, scroll down to the List section and select the 3 dots to the right and select Edit to manage it.
Within the Edit window, you can:

- Name your List.
- Typically, this coincides with the Status that is associated with it, so you can easily see which Contacts or Jobs are currently assigned to that Status. Whatever makes the most sense to you is the right way to name a List.
- Assign a Status to your List.
- You'll see the options formatted as "[Workflow] - [Status]". This will dictate what Contacts or Jobs show up under the List, as previously mentioned.
- Sort the List to your liking.
- You can choose from a variety of ways to sort the items in either ascending or descending order.
- Add Totals shows the total amount between the visible Jobs' Estimate Total, Invoice Total, Outstanding Invoice Total, Parent Estimate Total, Parent Invoice Total, or Parent Outstanding Invoice Total. You may apply more than one of these options at a time.
- Note: Only approved Estimates will be counted toward the combined "Estimate Total" dollar amount shown.

- These Totals will then show at the top of the List on your Board.

- Note: Only approved Estimates will be counted toward the combined "Estimate Total" dollar amount shown.
- Save or Cancel your changes.
List Totals will only display if the user viewing the Board has permission to see that information. For example, if the user viewing the Board doesn't have access to see Estimates, they will not see the Estimate Total.
Cards
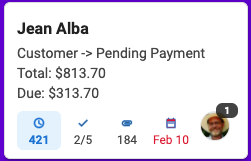
The white boxes that you see under each List are called Cards. They contain your Job information in the way you have customized it.
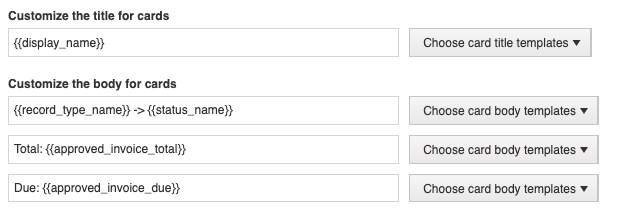
You can edit the Board to configure the properties as outlined below:
- You can select short-codes from the Choose card title templates to show information from the Contact or Job.

-
- Example: Selecting Contact > Display Name from the template dropdown menu as the title for the Cards.
- For the first line, included Contact > Type plus Contact > Status. You can also manually type in a small arrow symbol to separate the two.
- The second line contains Other > Sum of all Approved Invoices.
- The third line shows Other > Sum of Balance Due on all Approved Invoices.

- Example: Selecting Contact > Display Name from the template dropdown menu as the title for the Cards.
- The row at the very bottom of a Card cannot be adjusted. It contains the following data by default, in order from left to right:
- The number of days the Job has been in its current Status.
- How many Tasks have been completed out of the number that is currently assigned.
- The number of Attachments that have been uploaded to the Contact.
- With Contact or Job Scheduling, the record's due date will appear here.
- The picture or initials of one of the assignees to the record. This will be shown in the priority order below and cannot be changed.
- Assignees (sorted by last name).
- Subcontractors (sorted by last name).
- Sales Rep.
-
- The number above the initials or profile picture icon represents the total number of team members assigned to the record.
Boards on iOS
When you navigate to Boards on the iOS Mobile App, you will see:
- The Type of Board.
- The Title of the Board.
- The number of Cards within that Board.
- This number does not account for archived Cards. In other words, if only archived Cards exist within that Board, the number will reflect a zero.
- The number of Lists within that Board.
Lists
Once you select a Board, you will see:
- The Title of the Board.
- The Title of the List as well as the number of Cards within.
- The Job Card(s).
Cards
Each Card presents the following details about that specific Contact or Job:

- The name of the Contact or Job record.
- In order from left to right:
- The number of days the record has been in its current Status.
- The number of completed Tasks out of the total number related to the record.
- The number of attachments (Documents and Photos) associated with the record.
- Customized information you've configured through the Web App.
- Details about this can be found here.
- The initials or profile picture of the Assignee(s).
- This will only indicate specifically team members who are assigned to the record; Sales Reps will not be displayed.
Check out this article to discover Board filters.
Boards on Android
When you navigate to Boards on the Android Mobile App, you will see: 
- The Type of board (Contacts [the person icon], Work Orders [the briefcase icon], or Jobs [the tool icon]).
- The Title of the Board.
- The number of Lists within that Board.
- The number of Cards within that Board.
- This number does not account for archived Cards. In other words, if only archived Cards exist within that Board, the number will reflect a zero.
Lists
Once you select a Board, you will see:
- The Title of the Board.
- The Title of the List as well as the number of Cards within.
- The Job Card(s).
Cards

- The name of the Contact or Job record.
- In order from left to right:
- The number of days the record has been in its current Status.
- The number of completed Tasks out of the total number related to the record.
- The number of attachments (Documents and Photos) associated with the record.
- Customized information you have configured through the Web App.
- Details about this can be found here.
- The initials or profile picture of the Assignee(s).
- This will only indicate specifically team members who are assigned to the record; Sales Reps will not be displayed.
Check out this article to discover Board filters.