Prior to setting up your SalesRabbit+JobNimbus integration, make sure to contact your SalesRabbit Account Manager or SalesRabbit Support (support@salesrabbit.com or 801-418-9009) to confirm that the JobNimbus integration is enabled for your SalesRabbit account. Once you've confirmed that JobNimbus has been enabled, you can connect the integration using the steps below.
Part One: Preparing JobNimbus
In order for the integration between SalesRabbit and JobNimbus to work correctly, you will first need to create an API key in JobNimbus.
Create an API Key
- Open the API tab under the Integrations section in your JobNimbus Settings.
- Select New API Key.
- From the dropdown menu of the Description column, choose Sales Rabbit.
- Assign an access profile that has Settings access.
- Click Save.

- Select Copy next to the newly generated key.
Part Two: Set up the Integration within SalesRabbit
Now that we have prepared JobNimbus to sync with SalesRabbit, we need to finish configuring our SalesRabbit Settings.
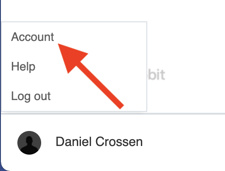
- In your SalesRabbit account, click on your profile icon and select Account.
- From the left-hand navigation menu, select Settings and then select Custom Lead Fields.

- Add the following custom lead field in your Custom Lead Fields.
Field Name Field Key Field Type Description Job Nimbus Contact ID jobNimbusContactID Lead Field - API Reference ID for update or create of JobNimbus Contact - Click API custom lead field box to add it and then change the name of the field to Job Nimbus Contact ID.
- Publish the field.

After you set up your custom lead field to reference JobNimbus, it's time to set up a custom form.
- In your SalesRabbit Settings, click on Form Builder.

- Click on New Form.

- Make a section called Contact Details and import the following lead fields.
Field Name |
Field Key |
Field Type |
Required / Optional |
Description* |
| First Name | firstName | Lead Field - First Name | Required* | First Name of customer |
| Last Name | lastName | Lead Field - Last Name | Required* | Last Name of customer |
| Business Name | businessName | Lead Field - Business Name | Optional | Business Name |
| Phone | phonePrimary | Lead Field - Phone | Optional | Phone of customer |
| Alternate Phone | phoneSecondary | Lead Field - Alternate Phone | Optional | Secondary Phone of Customer |
| Home Phone Number | homePhoneNumber | Form Field - Phone | Optional | Home Phone of customer |
| Fax Number | faxNumber | Form Field - Text | Optional | Fax number |
| Lead Field - Email | Optional | Email of customer | ||
| Street Address | street1 | Lead Field - Street Address | Optional | Street Address of customer |
| Apt/Suite | street2 | Lead Field - Apt/Suite | Optional | Apartment or suite number |
| City | city | Lead Field - City | Optional | City of customer |
| State | state | Lead Field - State | Optional | State of customer |
| Postal Code | postalCode | Lead Field - Postal Code | Optional | Postal Code of customer |
| Appointment Time | appointmentTime | Form Field - Date/Time | Optional | Appointment Time from form |
| Notes | note | Lead Field - Notes | Optional | Notes from the Lead |
| LeadSource | leadSource | Form Field - Dropdown | Optional | Can be passed to indicate the source of a lead (see image) |
| Job Nimbus Contact ID | jobNimbusContactID | Lead Field - API | Optional | Reference ID for update or create of JobNimbus Contact |
The API field MUST match the example provided. The First and Last Name fields are required. All other fields are optional.
If you have Jobs enabled. You can also create a second section for Job Details and add the following fields.
Field Name |
Field Key |
Field Type |
Required / Optional |
Description* |
| Job Name | jobName | Form Field - Text | Required | Name of your Job |
| Job Street Address | jobStreetAddress | Form Field - Text | Optional |
Job Address Note: Leave empty if same as Lead Address |
| Job City | jobCity | Form Field - Text | Optional |
Job City Note: Leave empty if same as Lead City |
| Job State | jobState | Form Field - Text | Optional |
Job State Note: Leave empty if same as Lead State |
| Job Zip Code | jobZipCode | Form Field - Text | Optional |
Job Zip Code Note: Leave empty if same as Lead Zip Code |
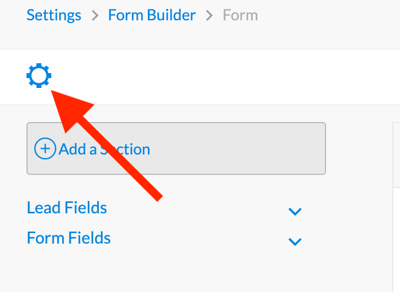
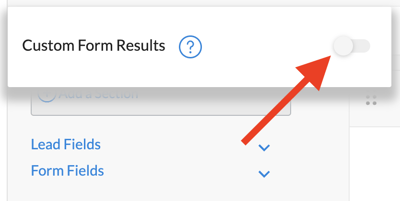
When your form is completed, click on the gear icon to turn on Custom Form Results. This will allow JobNimbus to send information to SalesRabbit.
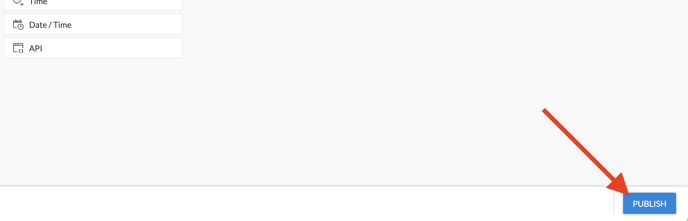
When you are done, click Publish.
Part Three: Connect JobNimbus with SalesRabbit
Now that everything is set up and ready, it's time to connect JobNimbus to SalesRabbit.
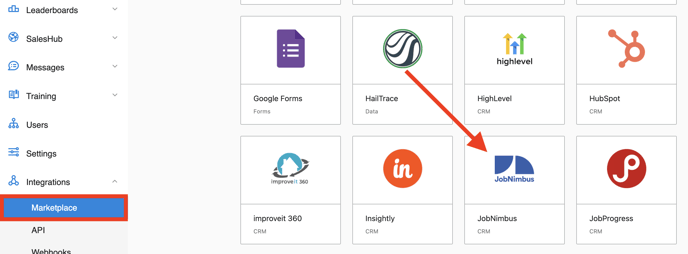
- In your settings, click on Integrations, and then Marketplace.
- Scroll down until you see JobNimbus and click on it.
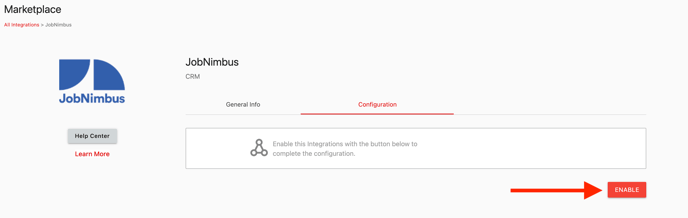
- To set up the integration, click on Configuration and then Enable.
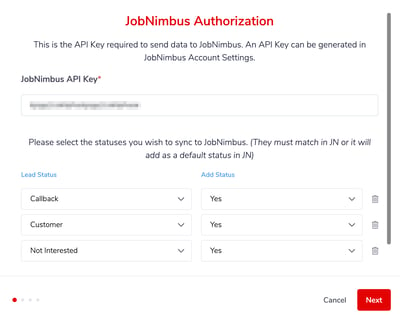
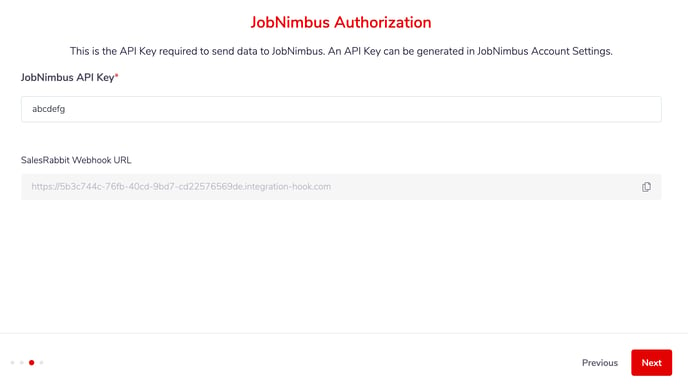
- Paste the API key from JobNimbus and select which statuses you want JobNimbus to send to SalesRabbit. Click Next.
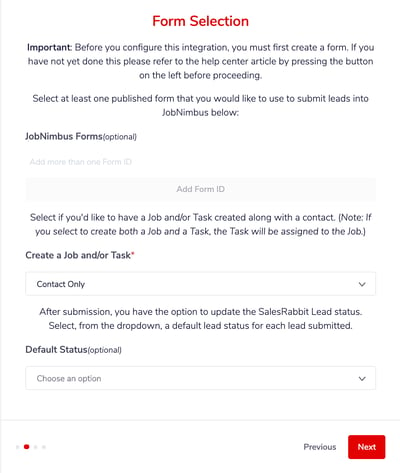
- Select the form you created earlier from your published forms.
- Select if you want to create contacts, jobs, or tasks, and then the default status for each record sent from JobNimbus. Then, click Next.
- If you want to sync your leads, toggle Sync Leads, map the status between the two platforms, then fill in the information for Task Type, Lead Source, and Workflow Name.
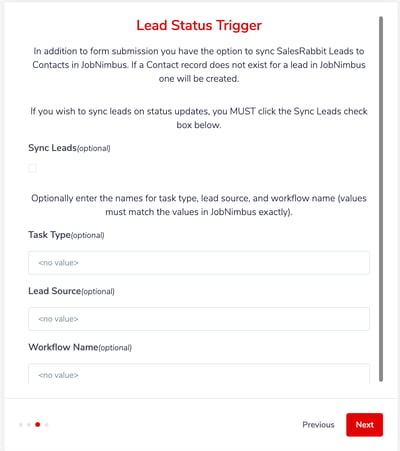
-
If you'd like to perform status updates or create leads in SalesRabbit from a status update in JobNimbus, fill out the information on the next window.
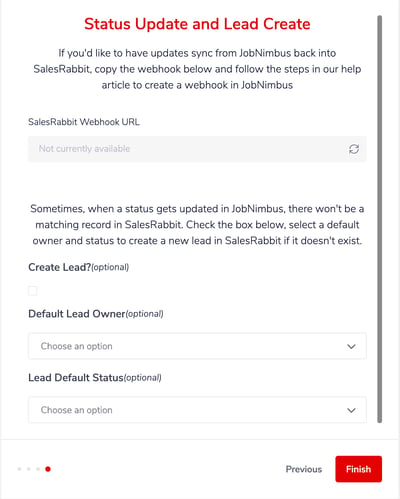
-
Click Finish.
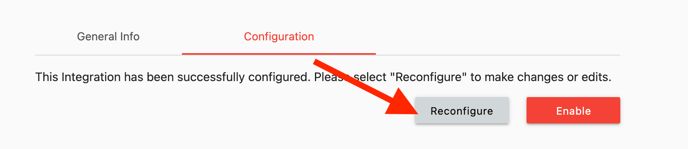
If at any time you need to reconfigure your integration, click on "Reconfigure".
Optional
If you would like status updates or leads created from a status update in JobNimbus, set up a new contact field and automation.
Creating your contact field
- Login to JobNimbus and navigate to your settings by clicking on your profile icon and select Settings from the drop-down menu.
- Select Contact Fields under the Workflow & Fields Settings and click Add Contact Field.

- Change the Field Name to SalesRabbit ID and select Text as the Type.

- Click Save.
Setting up your Automation
Select Automation from the settings menu and click Add Automation.
Recipe:
- Name the rule: SalesRabbit Status Update.
- Choose the "Event based" trigger type.
- Select the "Contact" trigger record.
- Choose when the record type is Modified.
- Select +Add Condition.
- If "Status" is equal to "[Status name]" (Add a condition for each status you want to use).
- Check the box next to Only if Status is modified.
- Check the radial for Require any condition to be true.
- Select +Add Action.
- Choose the Webhook Action.
- Copy and paste the webhook URL listed from the SalesRabbit JobNimbus Integration Configuration in your SalesRabbit account. (See the following image).
- Save the rule.
Congratulations! If you've successfully completed Parts 1 through 3, then you are done with enabling and setting up the SalesRabbit+JobNimbus integration. Now, you can proceed to use the integration as intended.