On This Page
Enabling SRS Distribution
- Click on your profile picture or initials in the top right corner and select Settings from the dropdown menu.
-
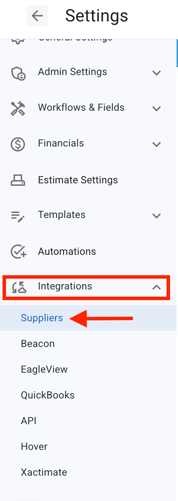
Within the Settings menu on the left, select Integrations, then Suppliers.
- JobNimbus will then direct you to the Suppliers list. If you have not yet connected any suppliers, you will see the page below. Select the Connect SRS button.

- If you already have one or more suppliers added to your JobNimbus account, select the SRS Distribution tab. Then, select the Connect SRS Distribution Account button.

-
Input your Customer Code, a recent invoice number, and Invoice date.

- Select Validate.
Note: Invoice dates must be older than 2 days in order for the account validation to work.
- If you do not have an Invoice, select the blue Don't have an invoice? link shown below.

- Then, enter your Customer Code and Integration Key.
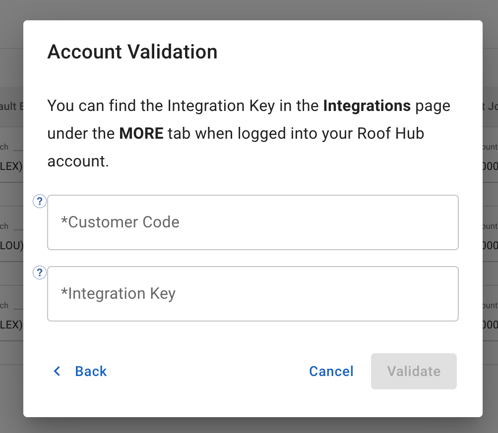
-
- To find your integration key, open another tab and go to your RoofHub account.
- Then, select the More dropdown at the top of your page and click Integrations.

-
- Once there, copy the Integration Key and input it into the corresponding field on your Account Validation window in JobNimbus.

- Once there, copy the Integration Key and input it into the corresponding field on your Account Validation window in JobNimbus.
- Once you have logged in and validated your account, follow the steps below.

- Select the SRS account you want to connect to your JobNimbus location.
- Select the Branch for that location.
- Select a Job Account.
- Next, select Import Templates to import your Templates into JobNimbus. This will automatically sync your SRS Products with JobNimbus.
- Once you click the Import Templates button, you will see the following message.

- In general, imports take under 3 minutes to complete. The button will remain in the "Import Started" state until you leave the page. You do not need to stay on this page during the import as it will continue to work in the background.
Note: Templates can only be imported once. If you make an update to a template in RoofHub, the update will not reflect in JobNimbus. Instead, you will need to create a new template in RoofHub and import it.