On This Page
Enable Company Documents
-
Click on your profile icon or initials in the top right corner. Then, select Settings from the dropdown menu.
- From the Settings menu on the left, open the Admin Settings tab, then select the Features option.

- Toggle the switch next to Company Documents.

Enabling this feature unlocks a new option in your Profile menu.
Accessing Company Documents
On the Web App
Click on the three lines in the top left corner and choose Company Document from the bottom of the dropdown menu.
To upload files, click on the +Upload Document button.

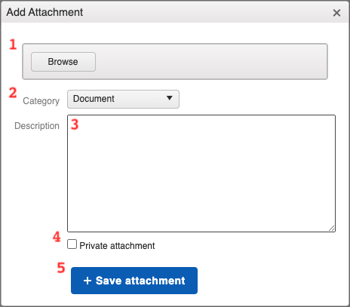
In the Add Attachment window, you can:
- Browse your computer for a file to upload.
- Choose a category for the attachment you upload.
- To create additional category options, click on your name in the top right corner and select "Settings" from the drop-down menu. Then, open the "Attachment Categories" tab from the left-side navigation menu. You can add custom categories by clicking on the "Add Attachment Category" button in the top right corner.

- To create additional category options, click on your name in the top right corner and select "Settings" from the drop-down menu. Then, open the "Attachment Categories" tab from the left-side navigation menu. You can add custom categories by clicking on the "Add Attachment Category" button in the top right corner.
- Write a description for the file. This description will appear under the attachment's title.
- Mark the attachment as private.
- Private attachments will only be seen by team members who have permission via the Access Profile settings.
- Click +Save attachment to upload the file to your Company Documents.
Documents are accessible to any team member who has the correct access permissions.
Note: The Company Documents feature is meant to be used as storage. Files uploaded as such cannot be further edited once they are saved.
On the Mobile App
Steps for iOS
Click on the Account tab and select Company Documents.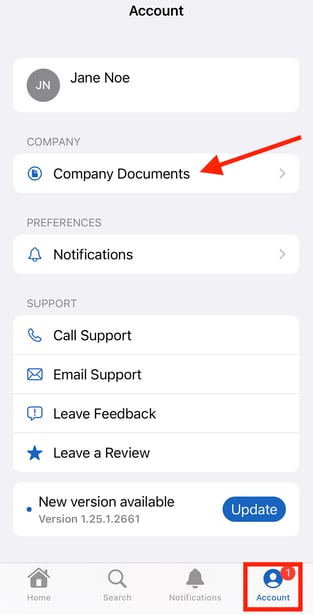
You will be able to view and sort any files that have been uploaded through the Web App.
Steps for Android
-
Click on the Account icon at the top left of your screen.

-
Select Company Documents.

You will be able to view and sort any files that have been uploaded through the Web App.
Note: Company Documents cannot be uploaded via the Mobile App.
Emailing Company Documents
If you attach a document from your Company Documents in an email, the file can no longer be deleted.
On the Web App
- Navigate to a Contact record.
- Select the +Send Email button located under the Activity tab.
- In the email builder window, scroll down until you see the link to Add Attachments.
- Click on the Company Documents tab to pull up all of the files you have uploaded to your Company Documents folder. You can then choose which attachment(s) to include in your email and send to your clients.

On the iOS
- Navigate to a Contact record.
- Click on the Email icon.

- Select the paperclip icon and choose Company Documents.

- Choose which file(s) to attach to the email and click done when you want to return to the draft.