How Do I Edit the Email Settings and Templates for My Estimates?
Learn how to CC and BCC team members and customize the email content sent with your financial documents in the New Sales Experience.
Please be aware that this article details how to update email settings for emails that are sent with financial documents through the New Sales Experience. To learn how to edit general email templates sent outside of the New Sales Experience, click here.
On This Page
Updating Email Settings
Note: In order to update Email settings in the New Sales Experience, you must have Account Settings access. If you do not see the option for Email Settings, it means that you do not have access. If you feel that you should have access to this, please reach out to your account admin to have them update your Access Profile.
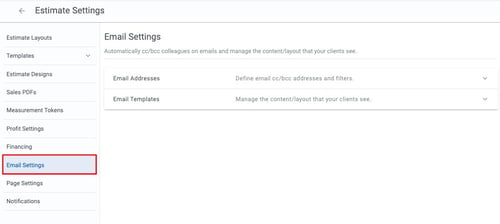
- To update your Estimate email settings, select the Estimate Settings option from your account's Settings menu.
- Or go to the Financials tab under any Job and then select the gear icon next to the Add Estimate button.

- Then, select the Email Settings tab.
Setting CC and BCC Recipients
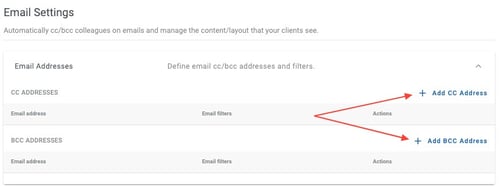
This feature enables you to automatically include team members as CC and BCC recipients in the emails sent with financial documents in the New Sales Experience.- To update who is CC'd or BCC'd, select the down arrow button on the right side of the the Email Addresses option.
- Click on the Add CC Address or the Add BCC Address option.
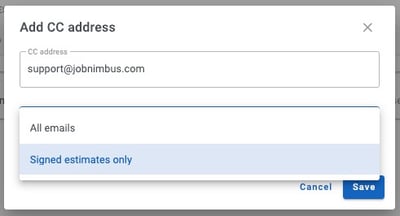
- Add the email address you want to CC or BCC. Then, choose whether you want the recipient to receive all emails sent through the New Sales Experience, or only when an Estimate is signed.
Tips:
- You only need to add an email address once, either as a CC or BCC recipient. It is not recommended to add an email address to both as this will cause duplicate emails to be sent to that email address.
- The person sending the email will automatically be CC'd on the email, so there is no need to add them in the CC or BCC option.
- There is not a way to remove the sender as a CC.
- The person sending the email will automatically be CC'd on the email, so there is no need to add them in the CC or BCC option.
- This feature specifically pertains to email templates and does not affect notification emails. For further details on other notification types, refer to the notification settings section.
Editing Email Templates
Email templates come premade in your Estimate settings, but you can customize them to meet your preferences.
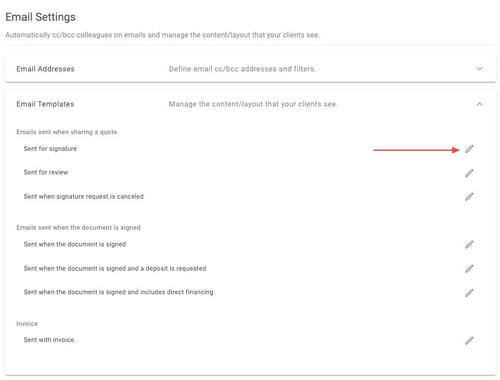
- To access the Email Templates section, select the down arrow button on the right side of the the Email Templates option.
- Then, select the pencil icon next to the template that you would like to edit.
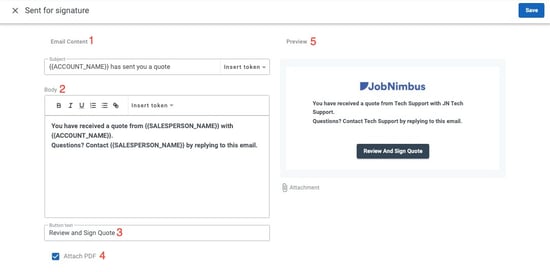
- Subject Line - Type in the Subject Line text box to make the subject lline more personalized to your business and your customers.
- Body - Customize the body of your email by typing in the Body text box. You can also edit the appearance of the text by utilizing the font editing options.
- You can also click the Insert token button to insert Contact and Job details by selecting the option you want from the drop down shown below.

- You can also click the Insert token button to insert Contact and Job details by selecting the option you want from the drop down shown below.
- Button Text - Customize the button text (the text displayed on the button your customer clicks to review and sign the document) to provide clear instructions for your customer on what action to take when they see the button.
- Attach PDF - In the "Sent for Signature" email template only, you can check or uncheck this option to attach your Estimate to the email as a PDF.
- You may choose to uncheck the Attach PDF option to encourage your customer to click on the Review and Sign Quote button instead of just viewing the attachment.
- Preview - The preview feature enables you to preview how the email template will appear to the customer when it is sent to them.
Note: Documents over 5MB will not appear as an attached PDF but instead will show as a "click here" link below the review and sign button.