Note: Work Orders must first be enabled before you can create Custom Fields.
Creating Custom Fields for Work Orders
- Click on the three lines in the top left corner and choose Settings from the dropdown menu.
-
Within the Workflows & Fields Settings menu, open the Work Order Fields tab.
- Click the +Add work order field button.

This will pull up the the window below.
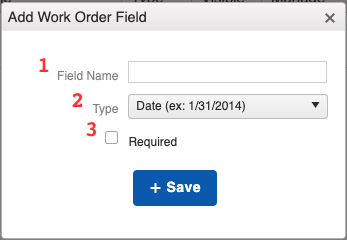
Here, you can:
- Give your field a name.
- Choose a field type from the available options:
- Date - Allows you to select from the calendar or input a date using the m/d/yyyy format.
- Decimal - Add a number that includes decimal placement. You can also check the box next to “Display as currency?” so the amount that is plugged into the field includes a dollar sign.
- Number - Whole numbers. A comma will automatically be added to numbers larger than 999.
- Text - A string of text containing symbols, numbers, and letters.
- Boolean - Add a checkbox to indicate yes/no. A marked checkbox translates as “true” (yes) and an unmarked checkbox translates as “false” (no).
- Options List - Add a drop-down list with up to 50 options to choose from.
- Mark the field as required. Checking this box will not allow you to save the changes to the Work Order until that field has been interacted with.
Each of these options will appear in the top portion of your Work Order when creating it. You can edit the information at any time by clicking on the three dots to the right of your Work Order and selecting "Edit" from the drop-down menu.
Learn more about Custom Fields and their limitations here.