How do I configure the JobNimbus integration with Leap?
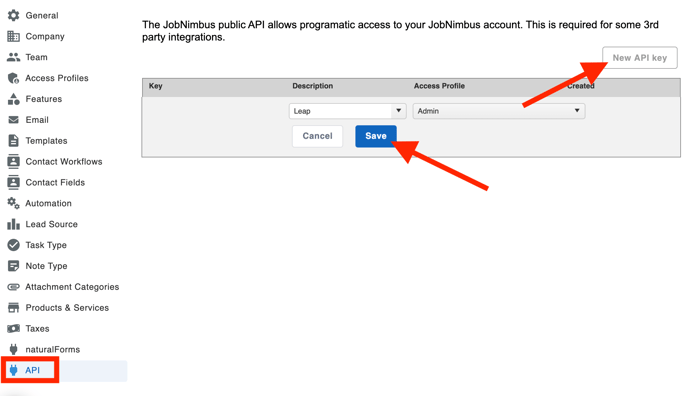
1. Create an API Key
- In JobNimbus, click on your profile icon or initials in the top right corner
- Select Settings from the drop-down menu
- From the Settings menu on the left, open the API tab
- Select New API Key
- From the "Description" drop-down menu, select Leap.
- From the "Access Profile" drop-down select an access profile with "full access"
- Select the blue Save button.
- To the right of the newly created API Key, select Copy.
2. Link JobNimbus to Leap
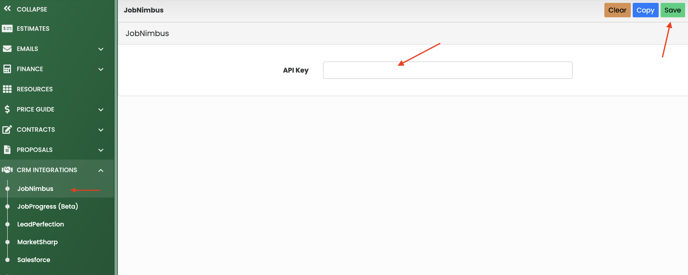
- In another browser tab, log in to your Leap account.
- From the navigation bar on the left, click on the CRM Integrations dropdown
- Open the JobNimbus tab
- Within the “API Key” field, paste your recently created API key and click Save
3. Tell Leap to Fetch Appointments from JobNimbus
JobNimbus connects with Leap to send over appointments assigned to your Sales Reps. The appointments include your Contacts' personal information along with any notes you've added to the appointment.
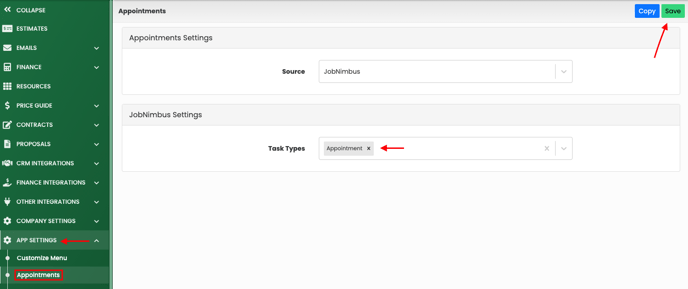
- From the navigation bar on the left, select the App Settings dropdown
- Open the Appointments tab
- Within the following window, locate the “Source” drop-down field and select JobNimbus.
- In the "Task Types" field, use the dropdown menu to select the types you would like to sync over to Leap
- The options given here are pulled directly from your JobNimbus Task Types. Refer to your JobNimbus settings to adjust these results.
- In the top-right of the page, click Save.
4. Tell Leap to Disposition/Result Your Lead
- From the navigation bar on the left, select the App Settings dropdown
- Open the Results Sending tab
- From this page, locate the “APIs” dropdown field and select JobNimbus.
- This allows PDFs of sent results to land in the associated Contact or Job's Documents tab. Choosing "Email" in addition to "JobNimbus" will also send the results to the related record via email.
- Within the Results section, choose a Title for the field in which a Status will be selected to move the Contact or Job into upon sending the results
- Select a JobNimbus Workflow from the Input Type dropdown field
- The Workflow options are labeled as "JobNimbus [Type Name] Workflow Picker". For details, refer to your JobNimbus Contact/Job Workflow Settings
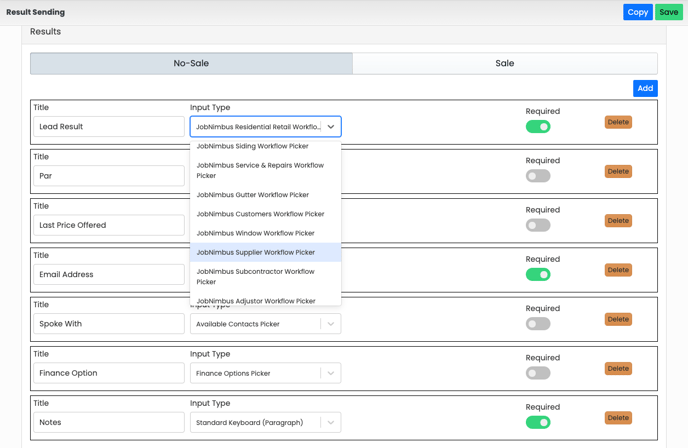
- Add additional titles for additional fields and configure their input type, if you'd like.
- In the top-right of the page, click Save.
5. Tell Leap to Send Contracts to Your JobNimbus Record
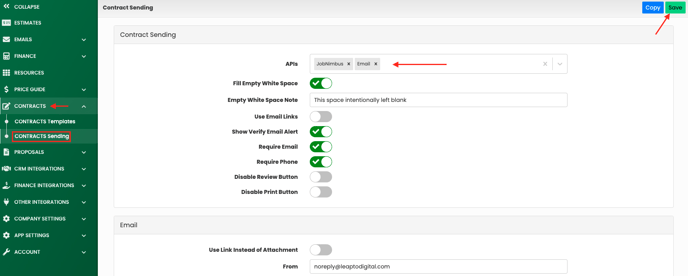
- From the navigation bar on the left, select the Contracts dropdown
- Open the Contract Sending tab
- From the following window, locate the “APIs” drop-down field and select JobNimbus.
- This allows PDFs of sent contracts to land in the associated Contact or Job's Documents tab. Choosing "Email" in addition to "JobNimbus" will also send the contract to the related record via email.
- In the top-right of the page, click Save.
6. Tell Leap to Send Proposals to Your JobNimbus Record
- From the navigation bar on the left, select the Proposals dropdown
- Select Proposal Sending.
- From the Proposal Sending Settings window, locate the “APIs” drop-down field and select JobNimbus.
- This allows PDFs of sent proposals to land in the associated Contact or Job's Documents tab. Choosing "Email" in addition to "JobNimbus" will also send the proposal to the related record via email.
- In the top-right of the page, click Save.

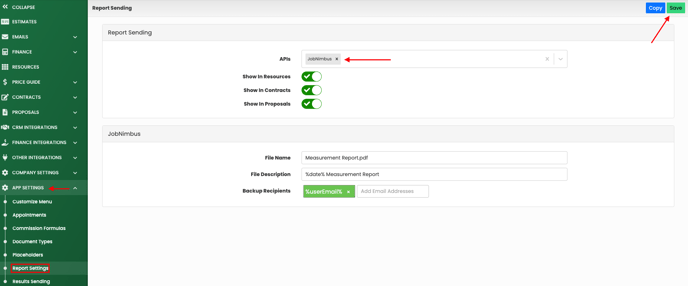
7. Tell Leap to Send Reports to Your JobNimbus Record
- From the navigation bar on the left, select the App Settings dropdown
- Open the Report Settings tab
- From the following window, locate the “APIs” drop-down field and select JobNimbus.
- In the top-right of the page, click Save.
