![JN_Logo_Long-White@1x.png]](https://support.jobnimbus.com/hs-fs/hubfs/JN_Logo_Long-White@1x.png?height=40&name=JN_Logo_Long-White@1x.png)
Clicking on the "Add Condition" button in an Automation Rule will pull up the window pictured below. The options you are given will depend on the Trigger Record chosen.
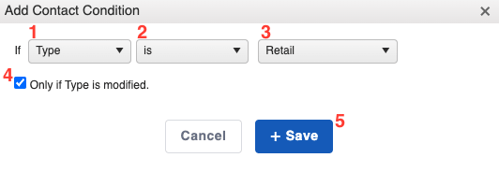
Here, you can:
- Choose the Condition for the record type. The available categories will vary based on the Triggering Record.
- For example: when using a Contact record, you can choose the condition to be a Workflow Type, a Status, or a Custom Contact Field. A Task, on the other hand, will pull up categories like "Is Completed", Task Type, or Priority.
- Determine whether the category "is" or "is not" to the option chosen in the next drop-down menu.
- Specify the Condition further.
- For example: when using a Contact record's Workflow Type as the Condition, you can require the Type to be "Residential Retail"; when a Contact is assigned to that Workflow Type, the Action can trigger.
- Check the box labeled "Only if Type is modified" to make the Automation trigger only when an Action changes the chosen aspect of the record. This is helpful when you want the Automation to run only when the record type category is modified, rather than each time an action is taken while the record belongs to the given Type.
- This box only shows up when creating Event-Based Automations; you will not have this option when creating a Time-Based Automation.
- Save your Condition.
Automation conditions can only check fields on the record that triggers the Automation. A Job Automation can check the Job's custom fields, but not the custom fields on the Job's Contact. A Contact Automation can't check Job fields.
To make a Job Automation depend on something you track on the Contact, such as customers you don't want to follow up with, add a matching Job custom field. Use an Options List field with Yes and No options, and set it on every Job, not only the ones to skip. Then add a custom field condition such as is No. A Job with the field left blank won't match that condition. The Job field doesn't update from the Contact, so set it on each new Job, and update the customer's Jobs if their Contact field changes.
Adding a Condition will open another option below the list of Conditions. This will allow you to require that either all of the Conditions be met, or that any of the Conditions be met in order for the Action to be triggered.
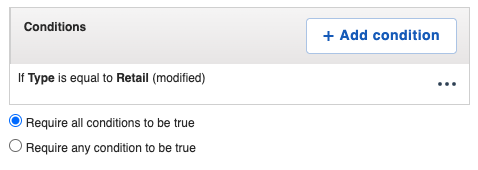
If you select Require all conditions to be true, every Condition you have entered into the Automation Rule must be met before the Automation can successfully run.
If the option Require any condition to be true is chosen, only one of the Conditions needs to be met in order for the Automation to successfully run.
Note:
You can add as many Conditions as you would like to your Automation Rule; the more specific a Rule is, the more control you have over when the Automation is triggered, resulting in a more targeted Action.
For example, when using a Contact record as the Trigger, you can add a Condition for "Type is Residential Retail", another Condition for "Status is Write Estimate", and then another for "Sales Rep is not John Doe".