If the top of your JobNimbus page shows only the Jobs tab as in the screenshot below, click here for instructions on creating both Jobs and Contacts.

If the top of your JobNimbus page shows either only the Contacts tab or both the Contacts and Jobs tabs as in the screenshot below, continue with this article.

Adding a Contact
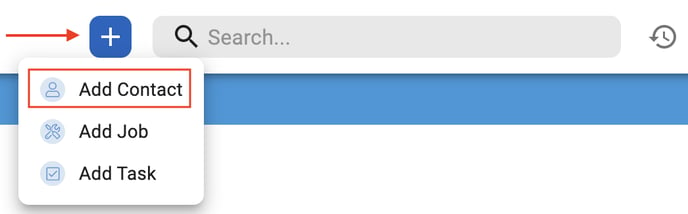
- On the JobNimbus web page, Click on the Blue + Icon located to the left of the search bar at the top.
- Choose Add Contact.
- A pop-up will appear with fields in which you can include basic information.
Click Show all fields to reveal more.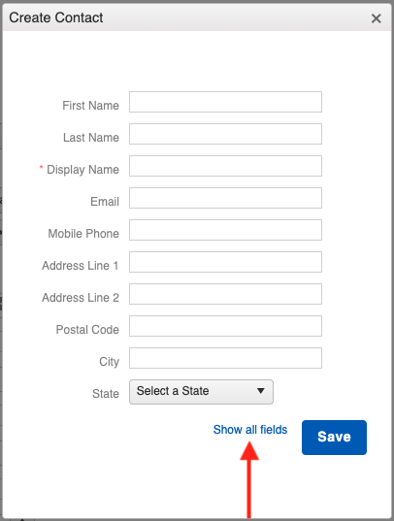
- Fill out any applicable details about your new Contact in each field and then hit Save.
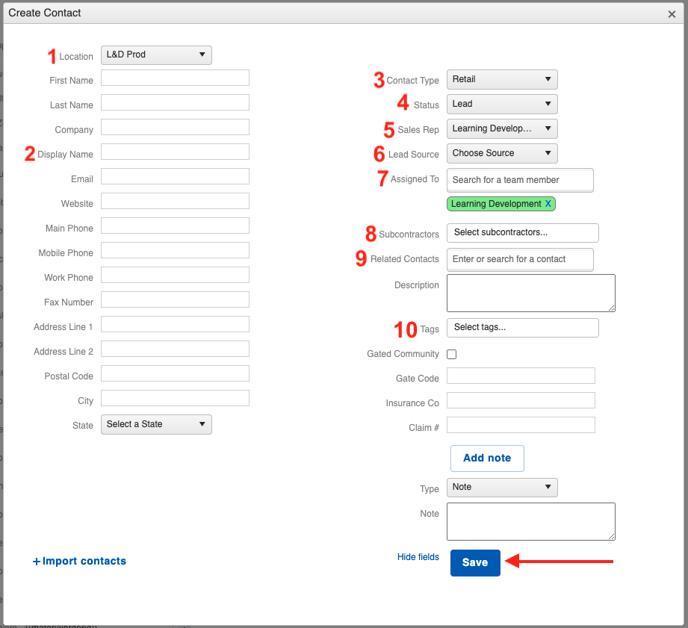
1. Location
Depending on your Company Settings, you may have the option to assign your Contact to a location other than the primary one you added when setting up your JobNimbus account. Learn more about additional locations here.
2. Display Name
This is how your Contact will be labeled. Since they are typically the same, that field will automatically pull whatever data is listed in the First and Last Name fields. You can also fill it out manually.
Note: Since it is possible to have multiple Contacts with the same names, you'll need to make sure the Display Name is unique for each one.
3. Contact Type
This is where you assign your Contact to a Workflow. The name of your Workflow will appear in the field drop-down menu as the "Type". This will determine the job process in which your Contact goes through from beginning to end. Learn about Workflows here.
4. Status
The options you have here are dependent on the Workflow assigned to your Contact. Since each Workflow indicates a different job process, you'll select a Status that coordinates with how your Contact is progressing. Statuses provide you a snapshot of where your clients are at and what steps need to be taken to keep business moving.
5. Sales Rep
Add the team member responsible for bringing this customer on board here. Those with Limited Access (see Access Profile settings) will be able to view and interact with the Contacts on which they are listed as the Sales Rep. This will also make it easier when creating reports to track the business each of your reps is acquiring.
Note: Only one person can be listed as the Sales Rep of a Contact. To link multiple team members to a Contact, consider utilizing the "Assigned To" field.
6. Lead Source
This field is where you will record how you landed this client, whether it was through social media, word of mouth, a marketing campaign, etc. Your Lead Sources can be reported on in the Sales tab on your Insights Dashboard. Learn how to customize your lead sources here.
7. Assigned To
An assignee is often (though not always) the same team member who is listed as the Sales Rep. Unlike the Sales Rep field, however, you can add more than one person to the Assigned To field. Limited Access users will be able to view Contacts they are assigned to, just like Sales Reps.
Note: By default, the user creating the Contact will be automatically assigned. You can remove the assignee by clicking the "X" inside the box next to the user's name.
8. Subcontractors
If you have the Subcontractor feature enabled, you will be able to select a name for this field. Doing so will notify them via email that they have been assigned to a Contact. Multiple Subcontractors can be assigned to a single Contact, if necessary. Learn more about Subcontractors here.
9. Related Contacts
By relating Contacts to one another, you can access information such as Activity, Documents, Tasks, and Photos that have been linked to one from the other Contact's page. This will also give you the option to communicate (e.g. via email) with any related Contact, without having to navigate to their individual records. Learn more about this here.
10. Tags
Tags are a convenient way to group Contacts together and easily report on those who might otherwise have no connection. Whether you create a tag to label customers who were affected by a certain storm, or you want to keep track of the customers who qualify for some special treatment, tagging is the way to do so. Since tags are fully reportable, you can create a Custom Report and filter by that specific tag.
Note: To remove a tag from the system, all instances of the tag must be deleted from every field to which it was added. Click the "X" next to a tag in the dropdown menu of the field to remove it. Once this has been done to all records on which it is listed, it will no longer appear.
Note: The fields from "Gated Community" to "Claim #" in the example above are unique Custom Fields that can be edited, hidden, and deleted, unlike the defaults.
Learn more about Custom Fields in this article.